Final Year Project: Semester 1&2 - Year 4
Final Year Project: Semester 1&2 - Year 4
Final Year Project: Semester 1&2 - Year 4
Eleura Wearable Device.
Eleura Wearable Device.
Industrial Design.
Industrial Design.
Problem Statement.
Problem Statement.
The aging population faces challenges in maintaining independence due to mobility issues, cognitive decline, health concerns, and feelings of loneliness and isolation. By designing a user-friendly solution, we can empower older adults to live independently with improved safety, accessibility, and opportunities for social engagement.
The aging population faces challenges in maintaining independence due to mobility issues, cognitive decline, health concerns, and feelings of loneliness and isolation. By designing a user-friendly solution, we can empower older adults to live independently with improved safety, accessibility, and opportunities for social engagement.
The aging population faces challenges in maintaining independence due to mobility issues, cognitive decline, health concerns, and feelings of loneliness and isolation. By designing a user-friendly solution, we can empower older adults to live independently with improved safety, accessibility, and opportunities for social engagement.
Phase 1
Phase 1
Research.
Research.
Secondary & Primary Research
Secondary & Primary Research
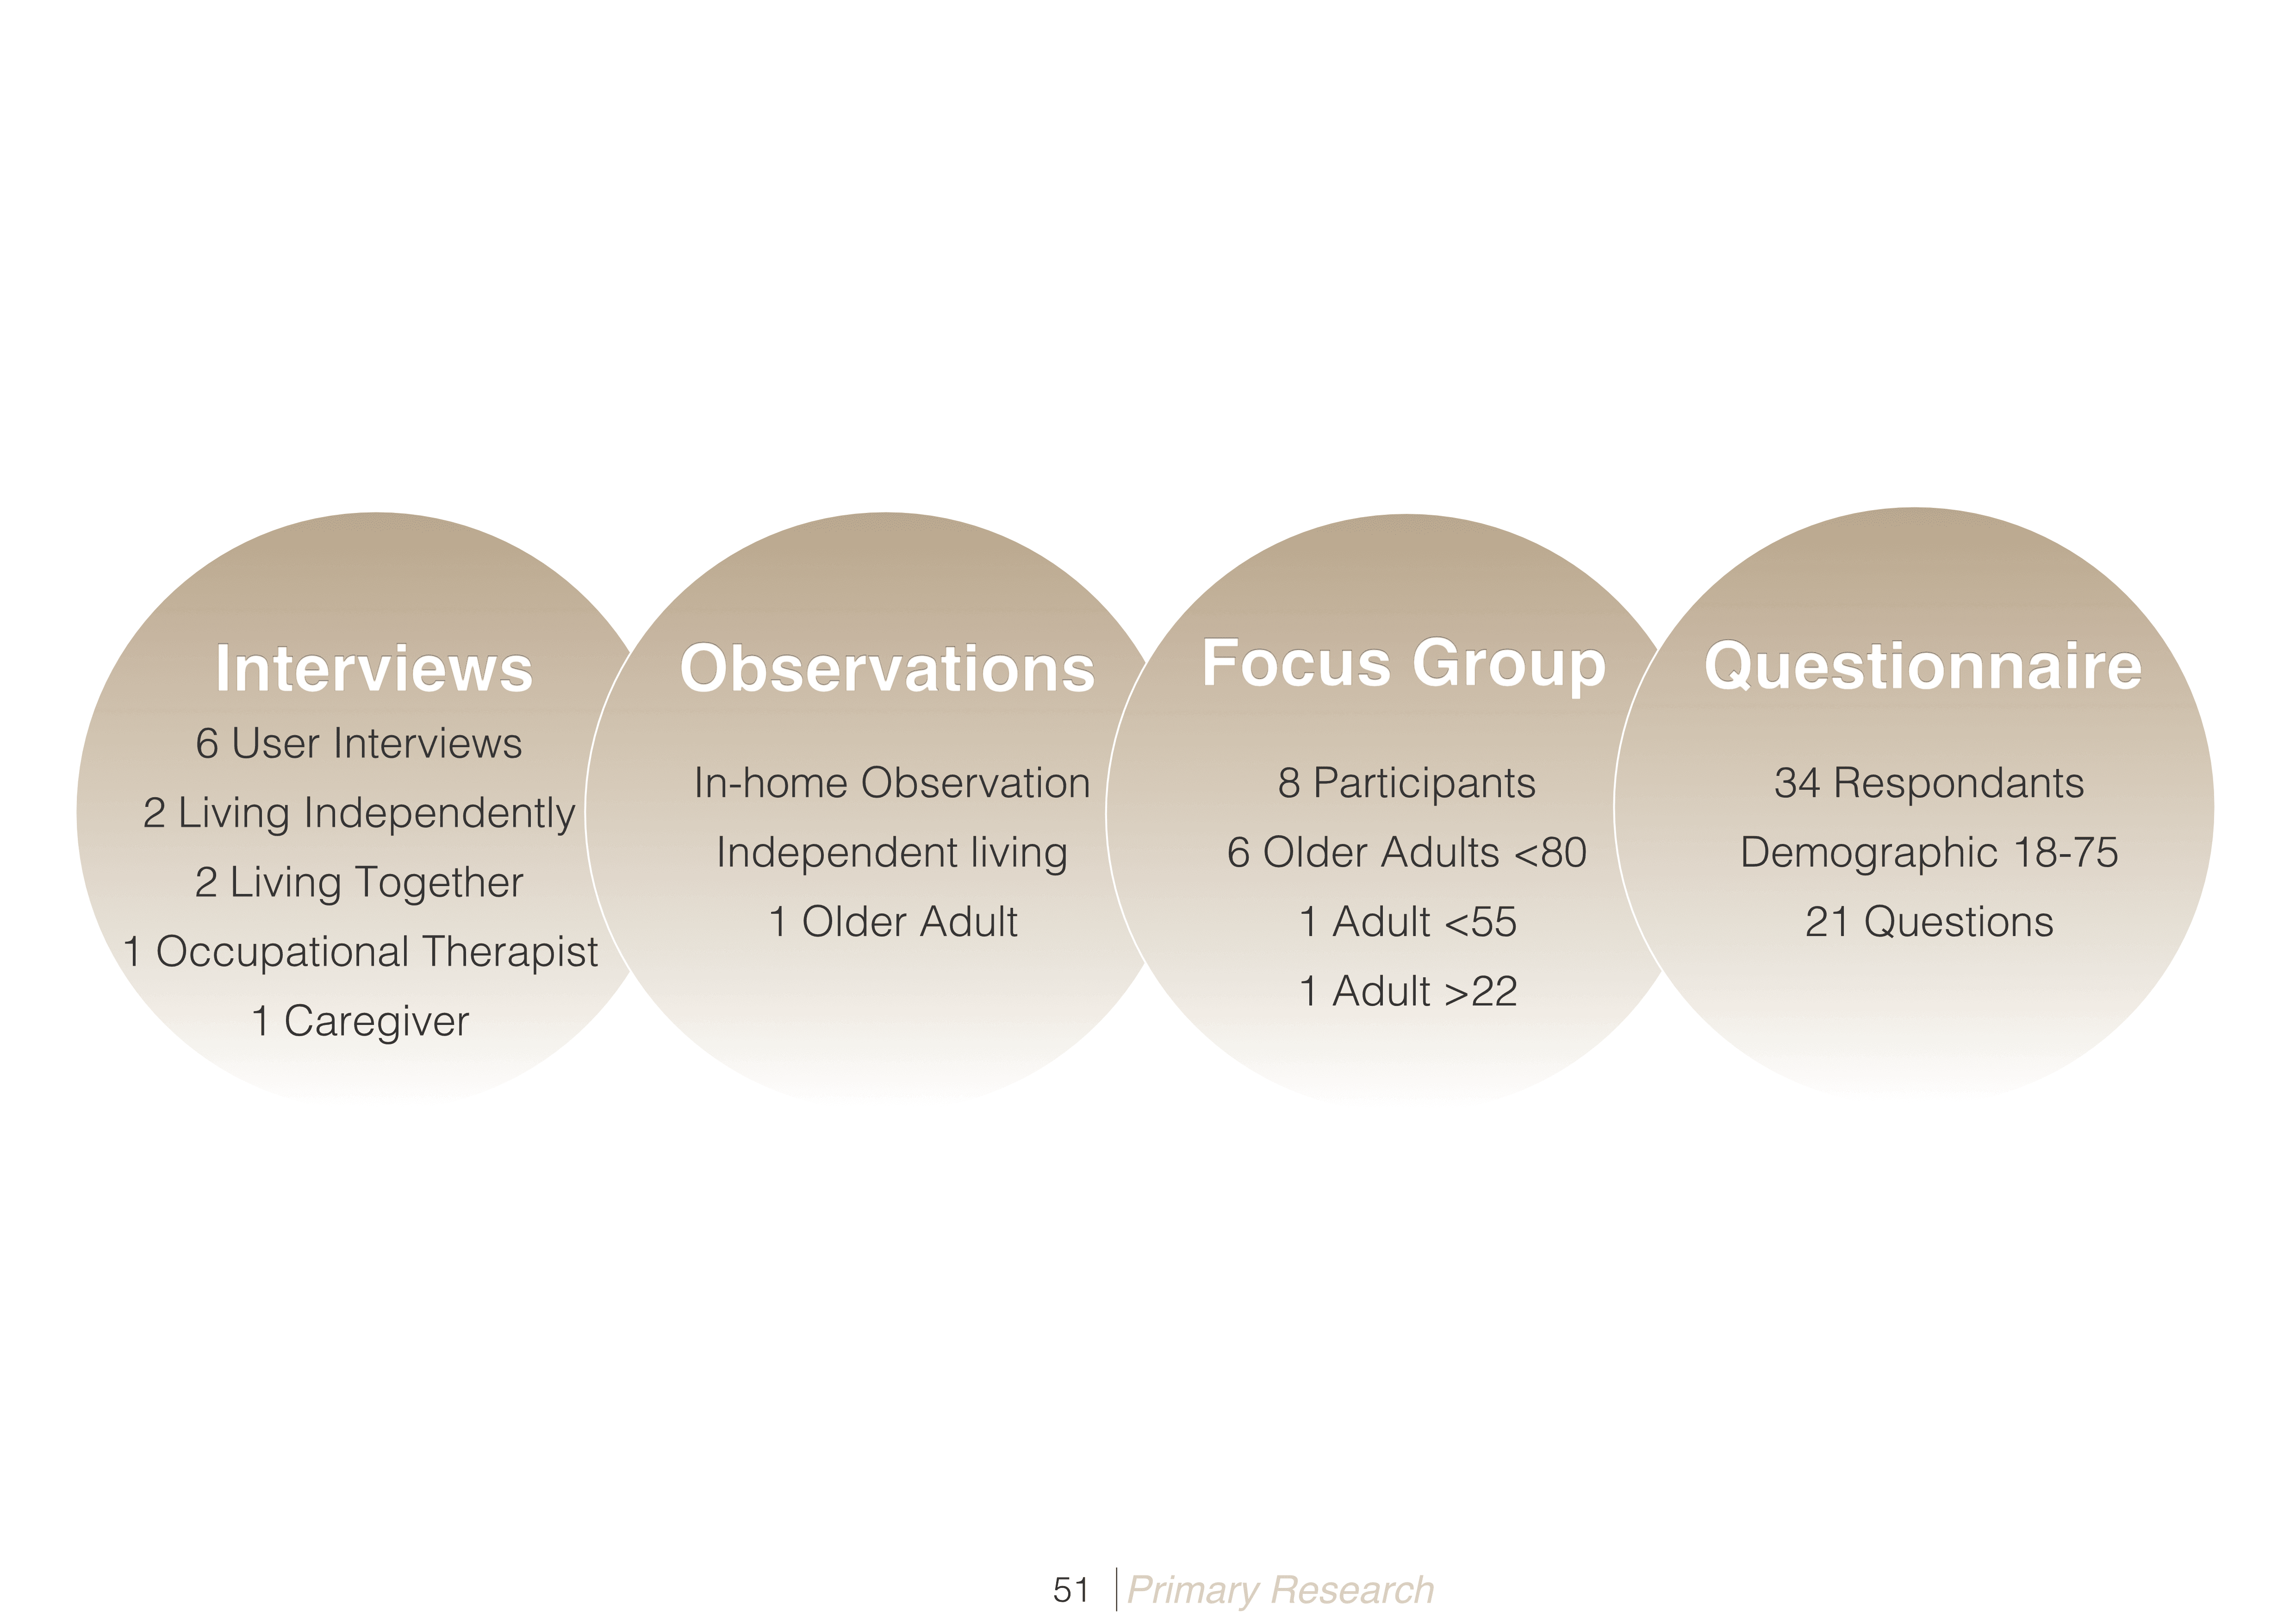
Primary Research Methods
Primary Research Methods
Detailing each of the research methods
Detailing each of the research methods
Detailing each of the research methods
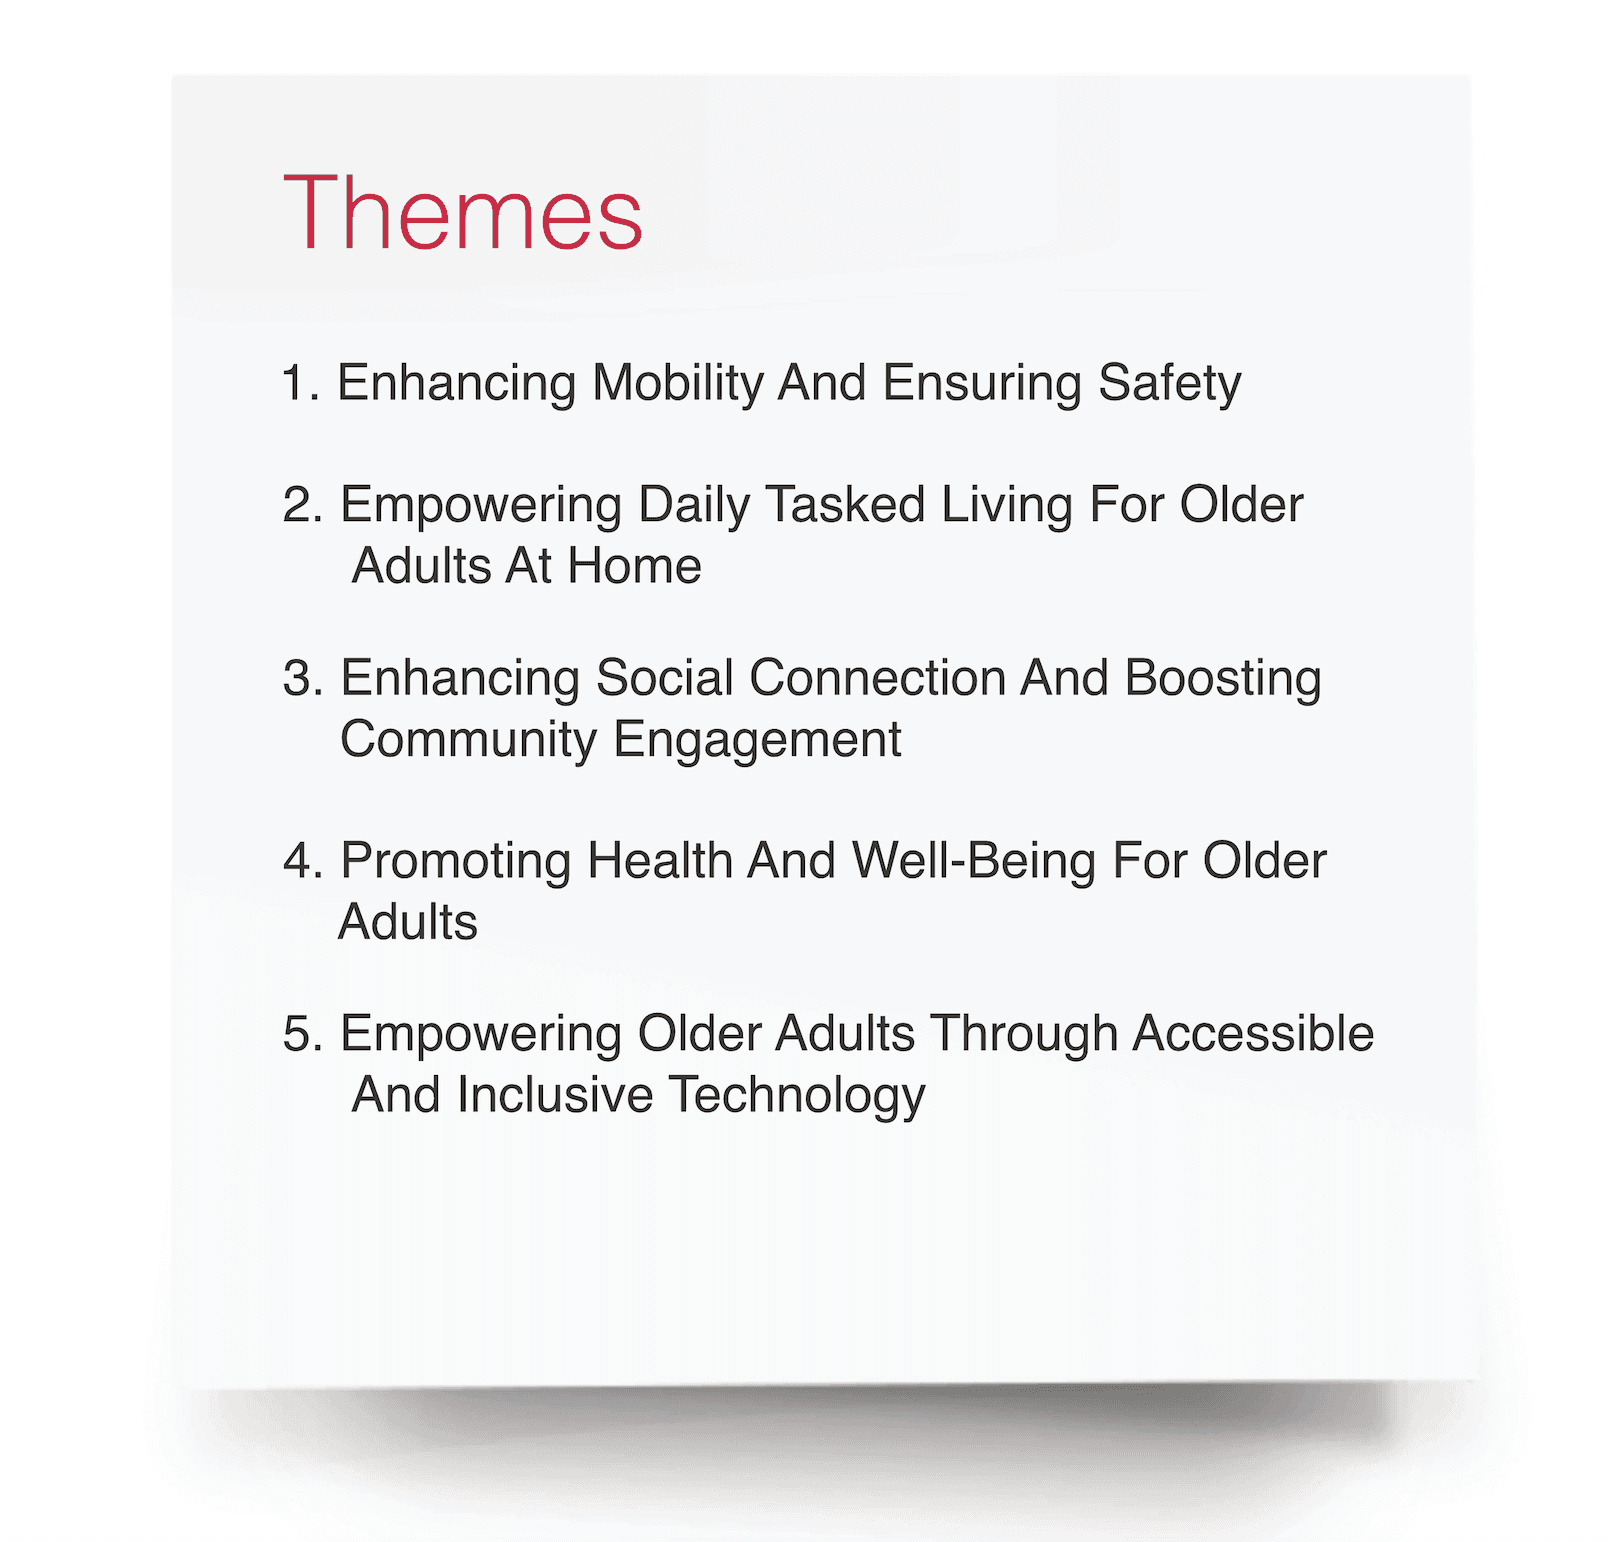
Themes
The themes concentrate on expressing the change in outcomes that needs to happen related to the problem statement
Design Guide
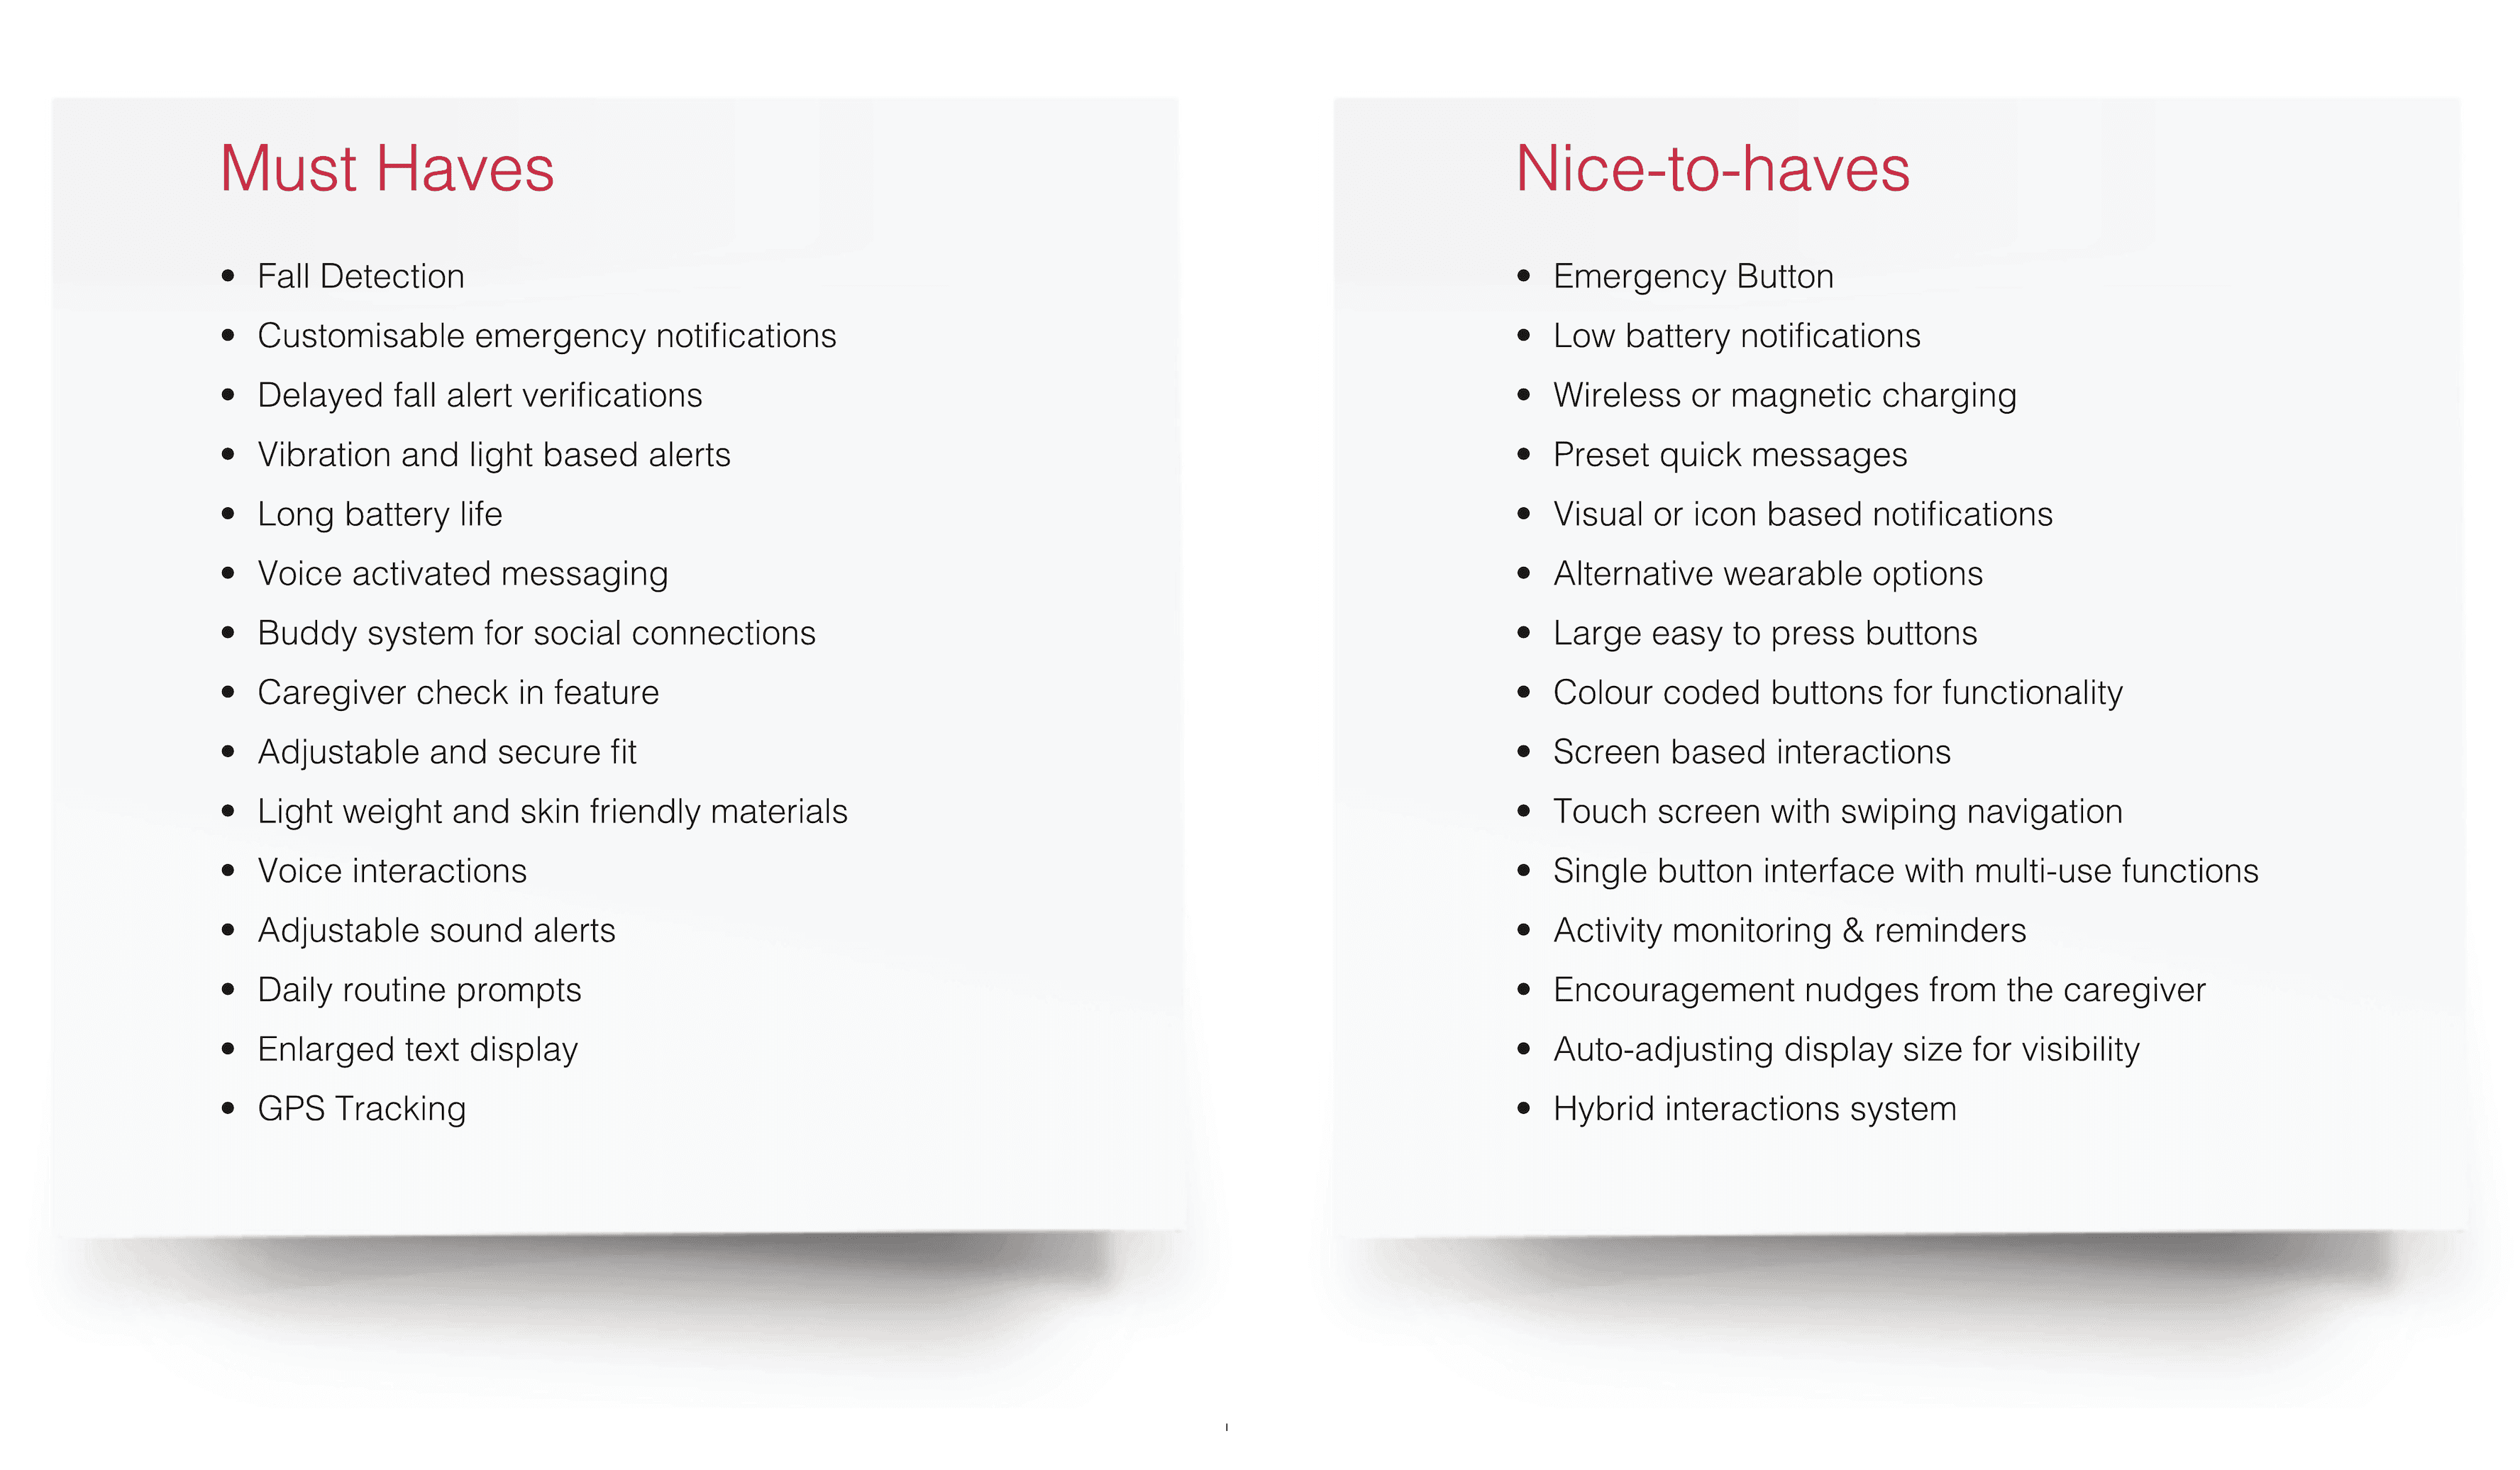
Must haves, Nice-to-haves
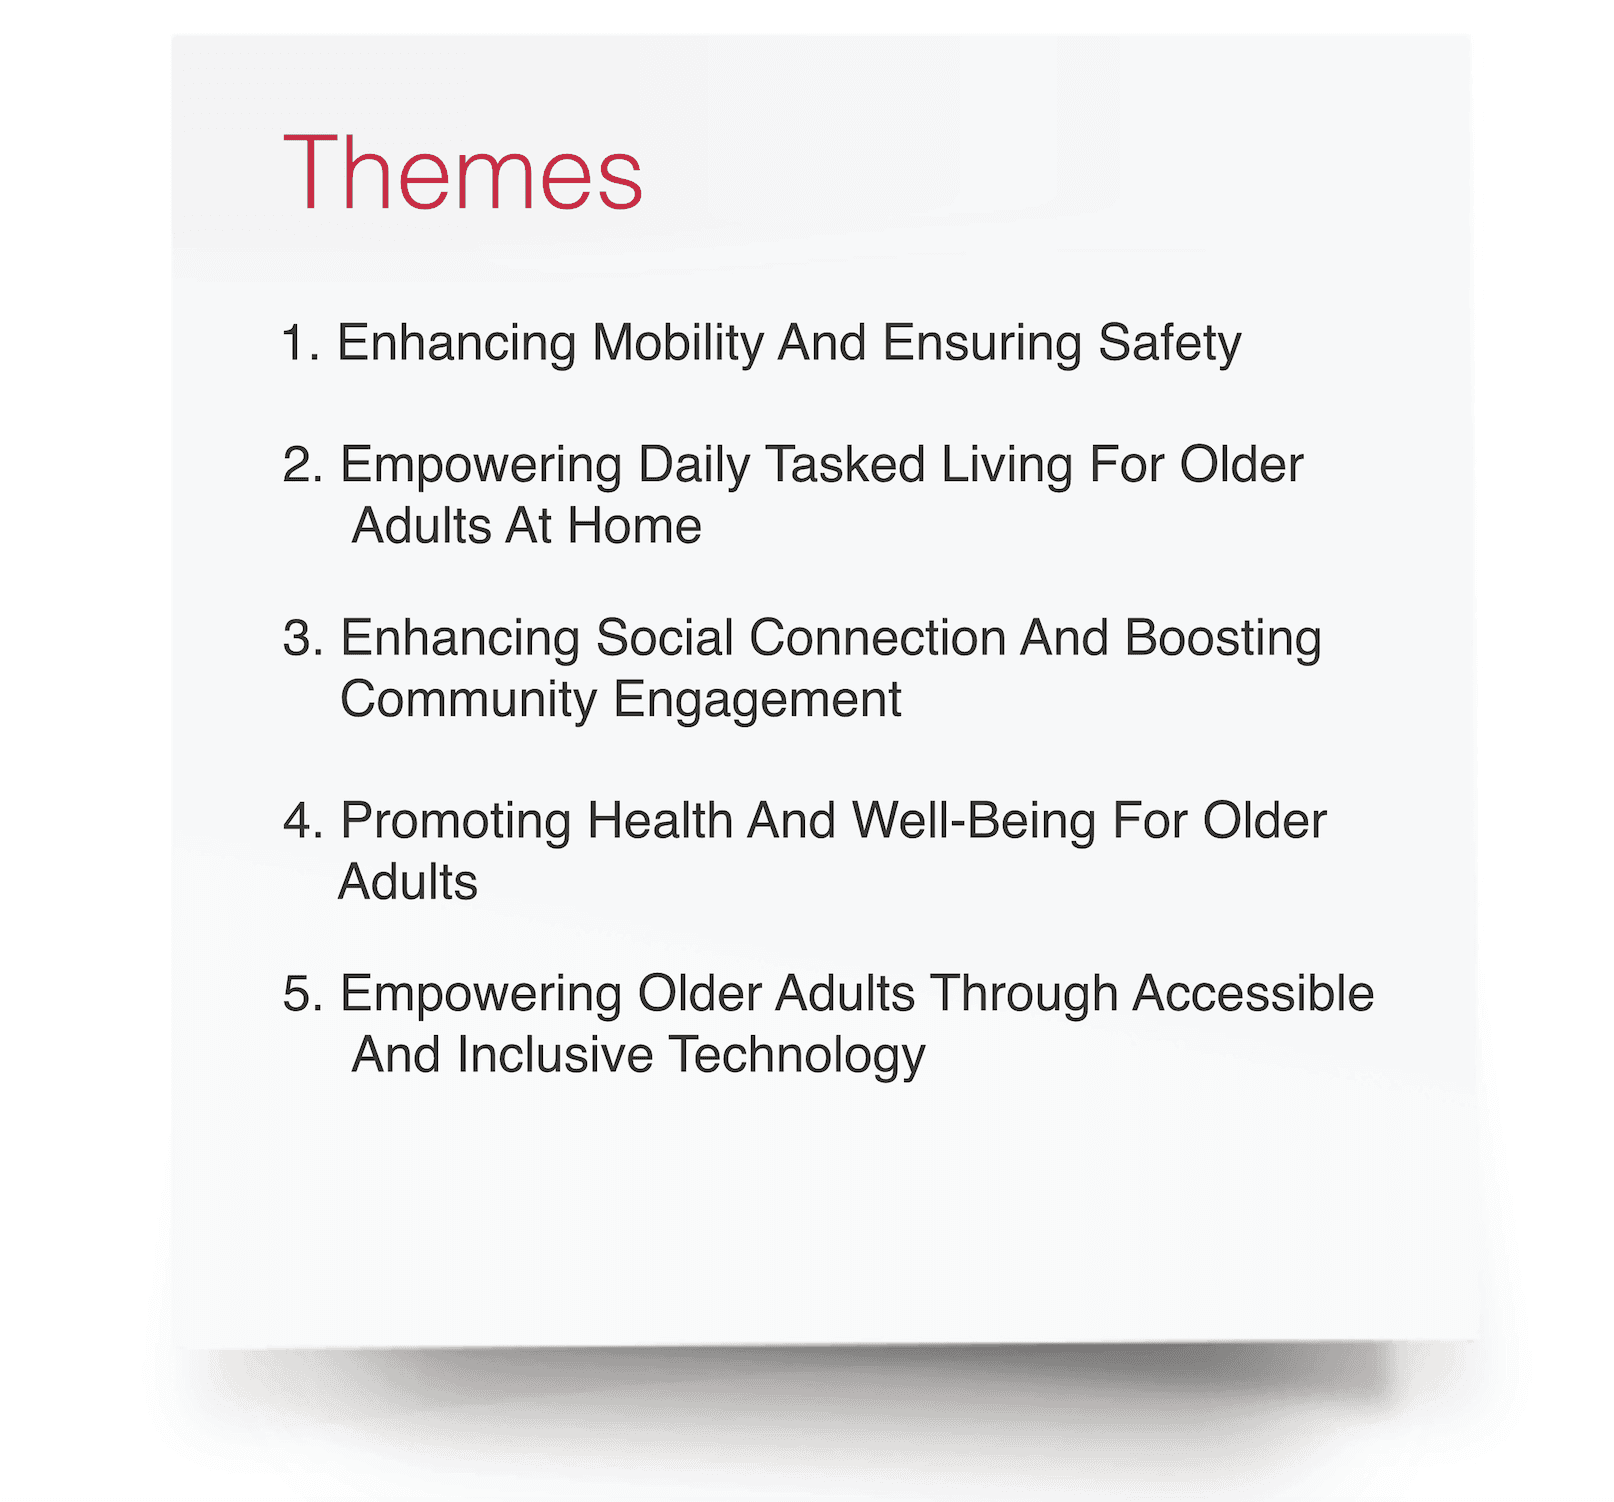
Themes
The themes concentrate on expressing the change in outcomes that needs to happen related to the problem statement
Design Guide
Must haves, Nice-to-haves
Themes
The themes concentrate on expressing the change in outcomes that needs to happen related to the problem statement
Design Guide
Must haves, Nice-to-haves
Phase 2
Phase 2
Iterations.
Iterations.
Digital & Hand Sketching.
Digital & Hand Sketching.

Phase 3
Phase 3
Concept Development.
Concept Development.
Sketching, Prototyping.
Sketching, Prototyping.


Phase 4
Phase 4
Concept Refinement.
Concept Refinement.
Clay Modelling, 3D Printing & User Testing.
Clay Modelling, 3D Printing & User Testing.


Female Wrist
Demographic 18 - 25

Male Wrist
Demographic 60 - 70

Female Wrist
Demographic 50 - 60Prototype 1
Clay Modelling


User Testing
3D Printing


Female Wrist
Demographic 50 - 60

Female Wrist
Demographic 18 - 25

Male Wrist
Demographic 60 - 70User Testing
Prototype 2
Clay Modelling


3D Printing


Prototype 3
Clay Modelling


Female Wrist
Demographic 50 - 60

Female Wrist
Demographic 18 - 25

Male Wrist
Demographic 60 - 703D Printing
User Testing


Prototype 4
Clay Modelling


3D Printing


Female Wrist
Demographic 50 - 60

Female Wrist
Demographic 18 - 25

Male Wrist
Demographic 60 - 70User Testing
Female Wrist
Demographic 18 - 25Male Wrist
Demographic 60 - 70Female Wrist
Demographic 50 - 60Prototype 1
Clay Modelling
User Testing
3D Printing
Female Wrist
Demographic 50 - 60Female Wrist
Demographic 18 - 25Male Wrist
Demographic 60 - 70User Testing
Prototype 2
Clay Modelling
3D Printing
Prototype 3
Clay Modelling
Female Wrist
Demographic 50 - 60Female Wrist
Demographic 18 - 25Male Wrist
Demographic 60 - 703D Printing
User Testing
Prototype 4
Clay Modelling
3D Printing
Female Wrist
Demographic 50 - 60Female Wrist
Demographic 18 - 25Male Wrist
Demographic 60 - 70User Testing
Female Wrist
Demographic 18 - 25Male Wrist
Demographic 60 - 70Female Wrist
Demographic 50 - 60Prototype 1
Clay Modelling
User Testing
3D Printing
Female Wrist
Demographic 50 - 60Female Wrist
Demographic 18 - 25Male Wrist
Demographic 60 - 70User Testing
Prototype 2
Clay Modelling
3D Printing
Prototype 3
Clay Modelling
Female Wrist
Demographic 50 - 60Female Wrist
Demographic 18 - 25Male Wrist
Demographic 60 - 703D Printing
User Testing
Prototype 4
Clay Modelling
3D Printing
Female Wrist
Demographic 50 - 60Female Wrist
Demographic 18 - 25Male Wrist
Demographic 60 - 70User Testing
User Testing
Female Wrist
Demographic 50 - 60Female Wrist
Demographic 18 - 25Male Wrist
Demographic 60 - 703D Printing
Prototype 1
Clay Modelling
Prototype 2
Clay Modelling
3D Printing
User Testing
Female Wrist
Demographic 50 - 60Female Wrist
Demographic 18 - 25Male Wrist
Demographic 60 - 70Prototype 3
Clay Modelling
3D Printing
User Testing
Female Wrist
Demographic 50 - 60Female Wrist
Demographic 18 - 25Male Wrist
Demographic 60 - 70Prototype 4
Clay Modelling
3D Printing
User Testing
Female Wrist
Demographic 50 - 60Female Wrist
Demographic 18 - 25Male Wrist
Demographic 60 - 70User Testing
Female Wrist
Demographic 50 - 60Female Wrist
Demographic 18 - 25Male Wrist
Demographic 60 - 703D Printing
Prototype 1
Clay Modelling
Prototype 2
Clay Modelling
3D Printing
User Testing
Female Wrist
Demographic 50 - 60Female Wrist
Demographic 18 - 25Male Wrist
Demographic 60 - 70Prototype 3
Clay Modelling
3D Printing
User Testing
Female Wrist
Demographic 50 - 60Female Wrist
Demographic 18 - 25Male Wrist
Demographic 60 - 70Prototype 4
Clay Modelling
3D Printing
User Testing
Female Wrist
Demographic 50 - 60Female Wrist
Demographic 18 - 25Male Wrist
Demographic 60 - 70
Clay Modelling
Female Wrist
Demographic 50 - 60Female Wrist
Demographic 18 - 25Male Wrist
Demographic 60 - 70User Testing
3D Printing
Prototype 1
Clay Modelling
3D Printing
Male Wrist
Demographic 60 - 70Female Wrist
Demographic 50 - 60Female Wrist
Demographic 18 - 25User Testing
Prototype 2
Clay Modelling
3D Printing
Female Wrist
Demographic 50 - 60Male Wrist
Demographic 60 - 70Female Wrist
Demographic 18 - 25User Testing
Prototype 3
Clay Modelling
3D Printing
Male Wrist
Demographic 60 - 70Female Wrist
Demographic 50 - 60Female Wrist
Demographic 18 - 25User Testing
Prototype 4
Clay Modelling
Female Wrist
Demographic 50 - 60Female Wrist
Demographic 18 - 25Male Wrist
Demographic 60 - 70User Testing
3D Printing
Prototype 1
Clay Modelling
3D Printing
Male Wrist
Demographic 60 - 70Female Wrist
Demographic 50 - 60Female Wrist
Demographic 18 - 25User Testing
Prototype 2
Clay Modelling
3D Printing
Female Wrist
Demographic 50 - 60Male Wrist
Demographic 60 - 70Female Wrist
Demographic 18 - 25User Testing
Prototype 3
Clay Modelling
3D Printing
Male Wrist
Demographic 60 - 70Female Wrist
Demographic 50 - 60Female Wrist
Demographic 18 - 25User Testing
Prototype 4
Phase 5
Phase 5
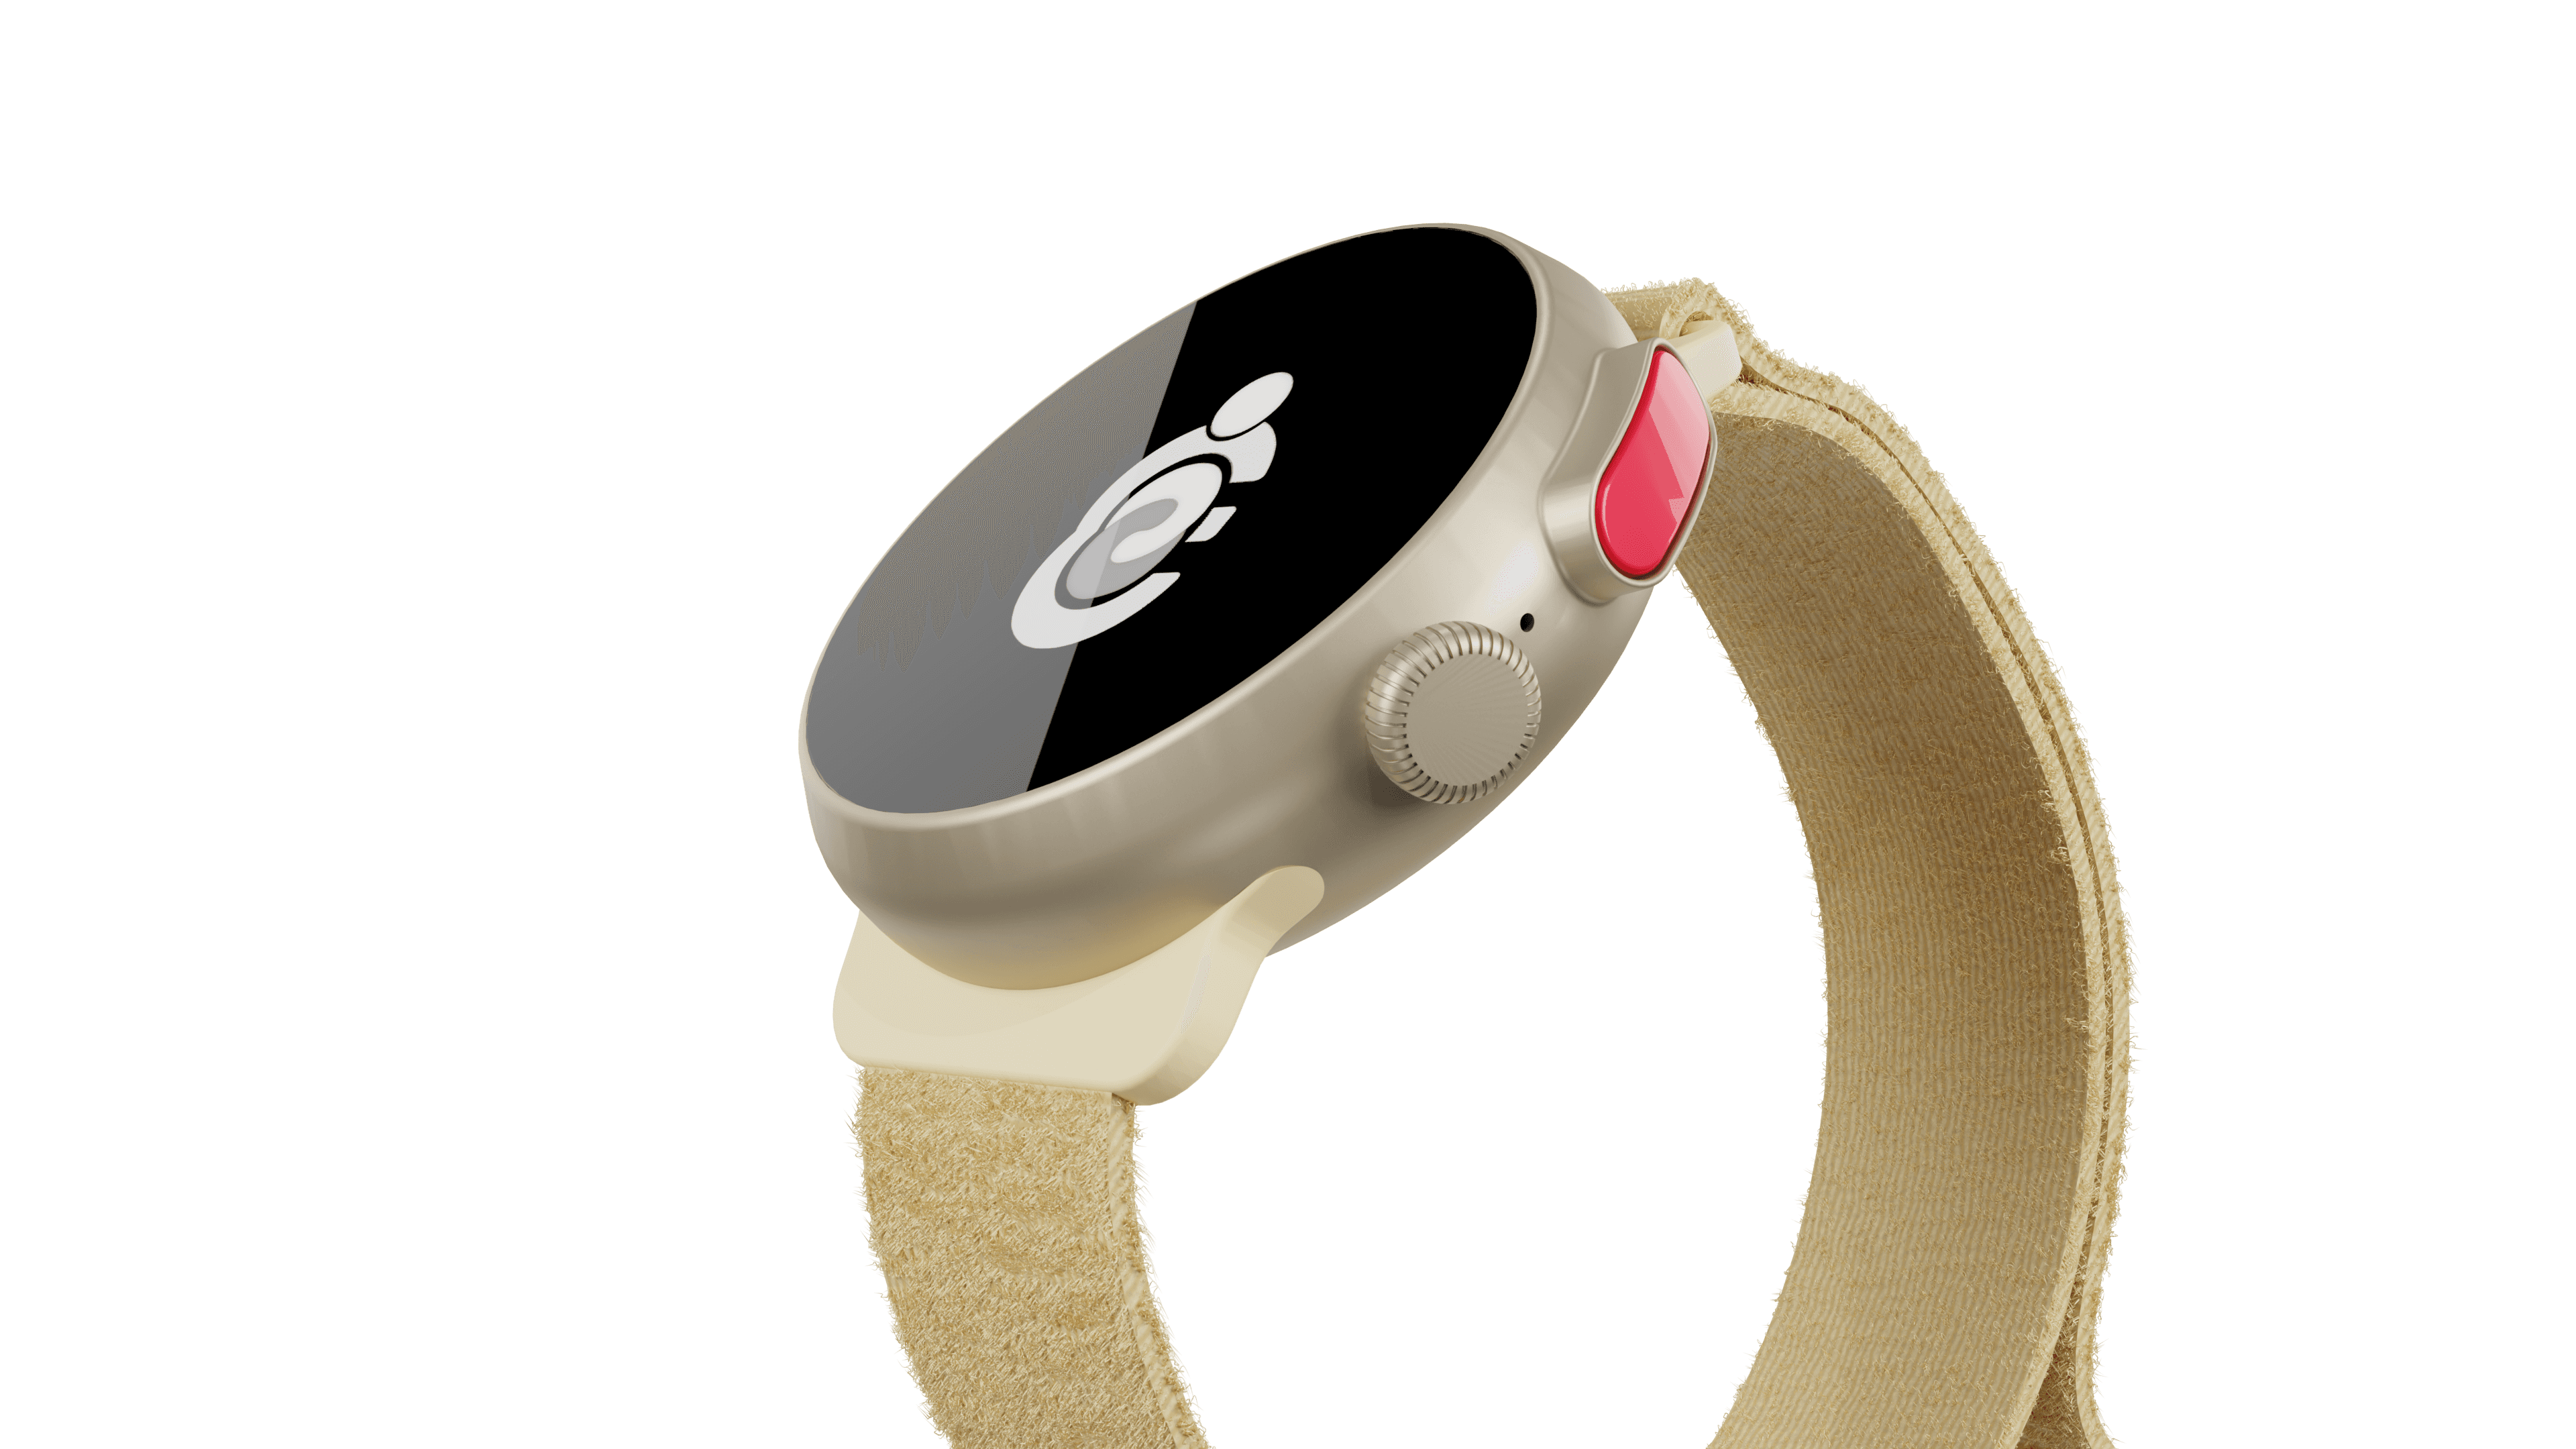
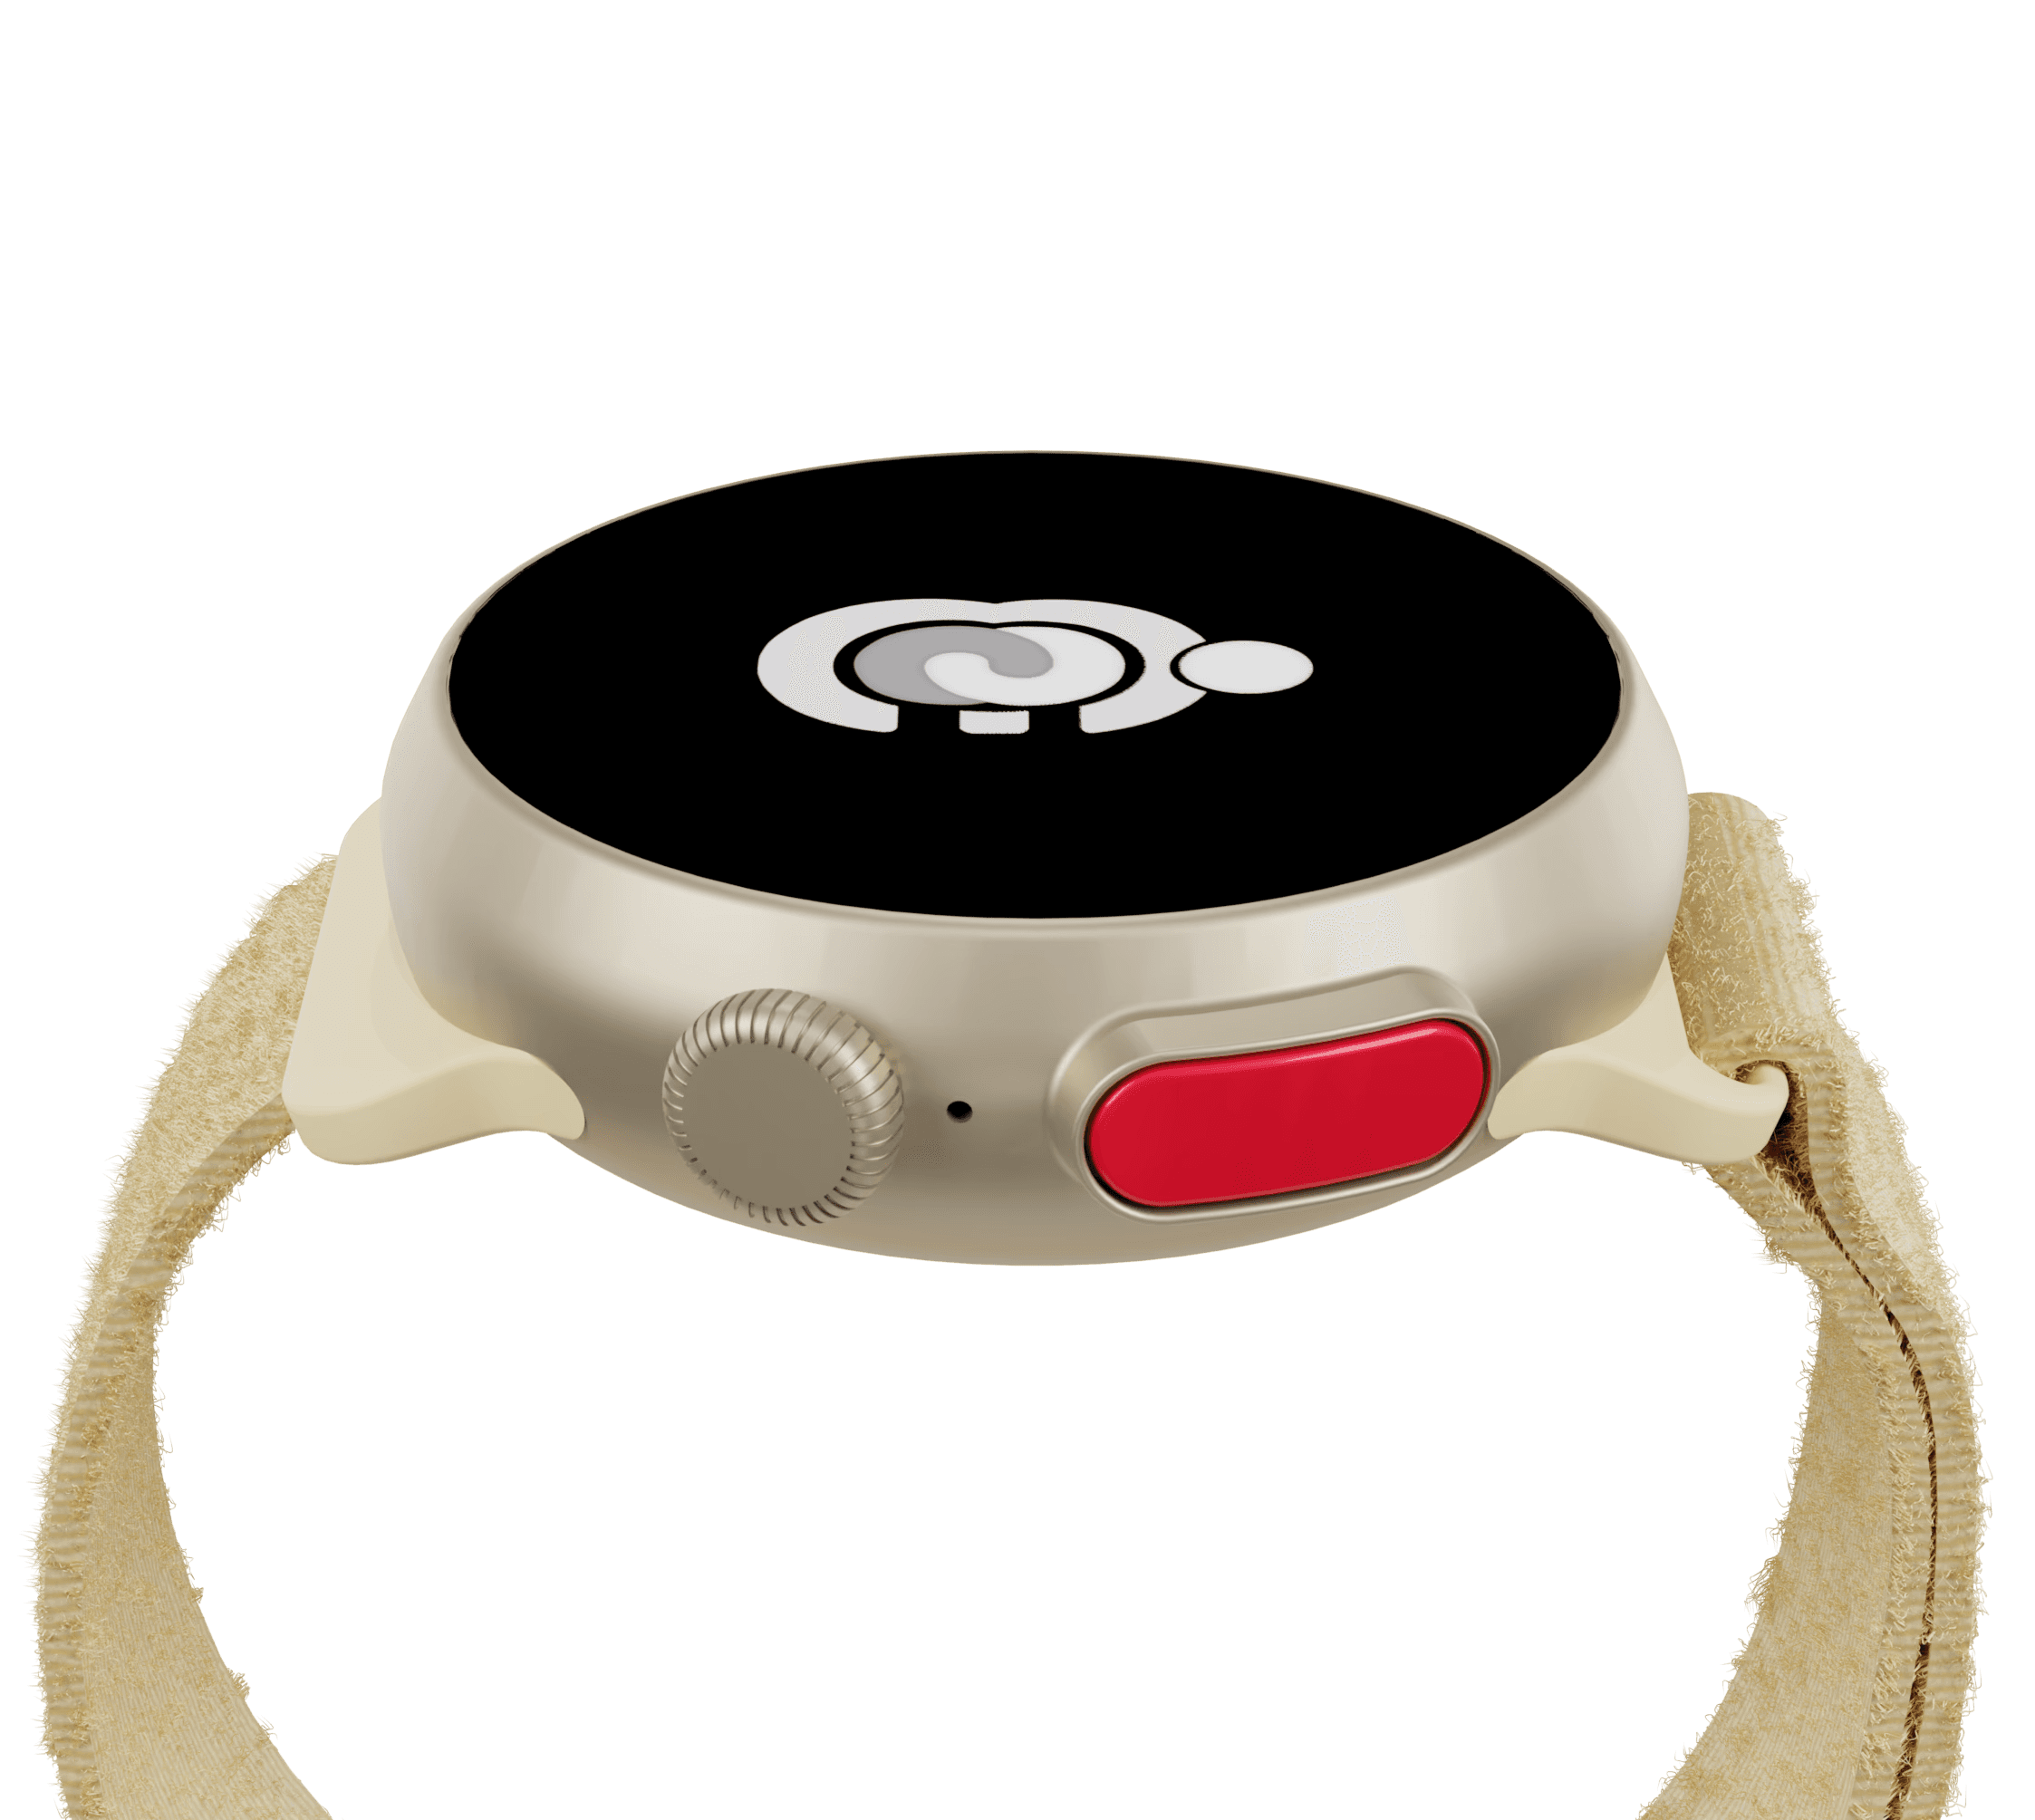
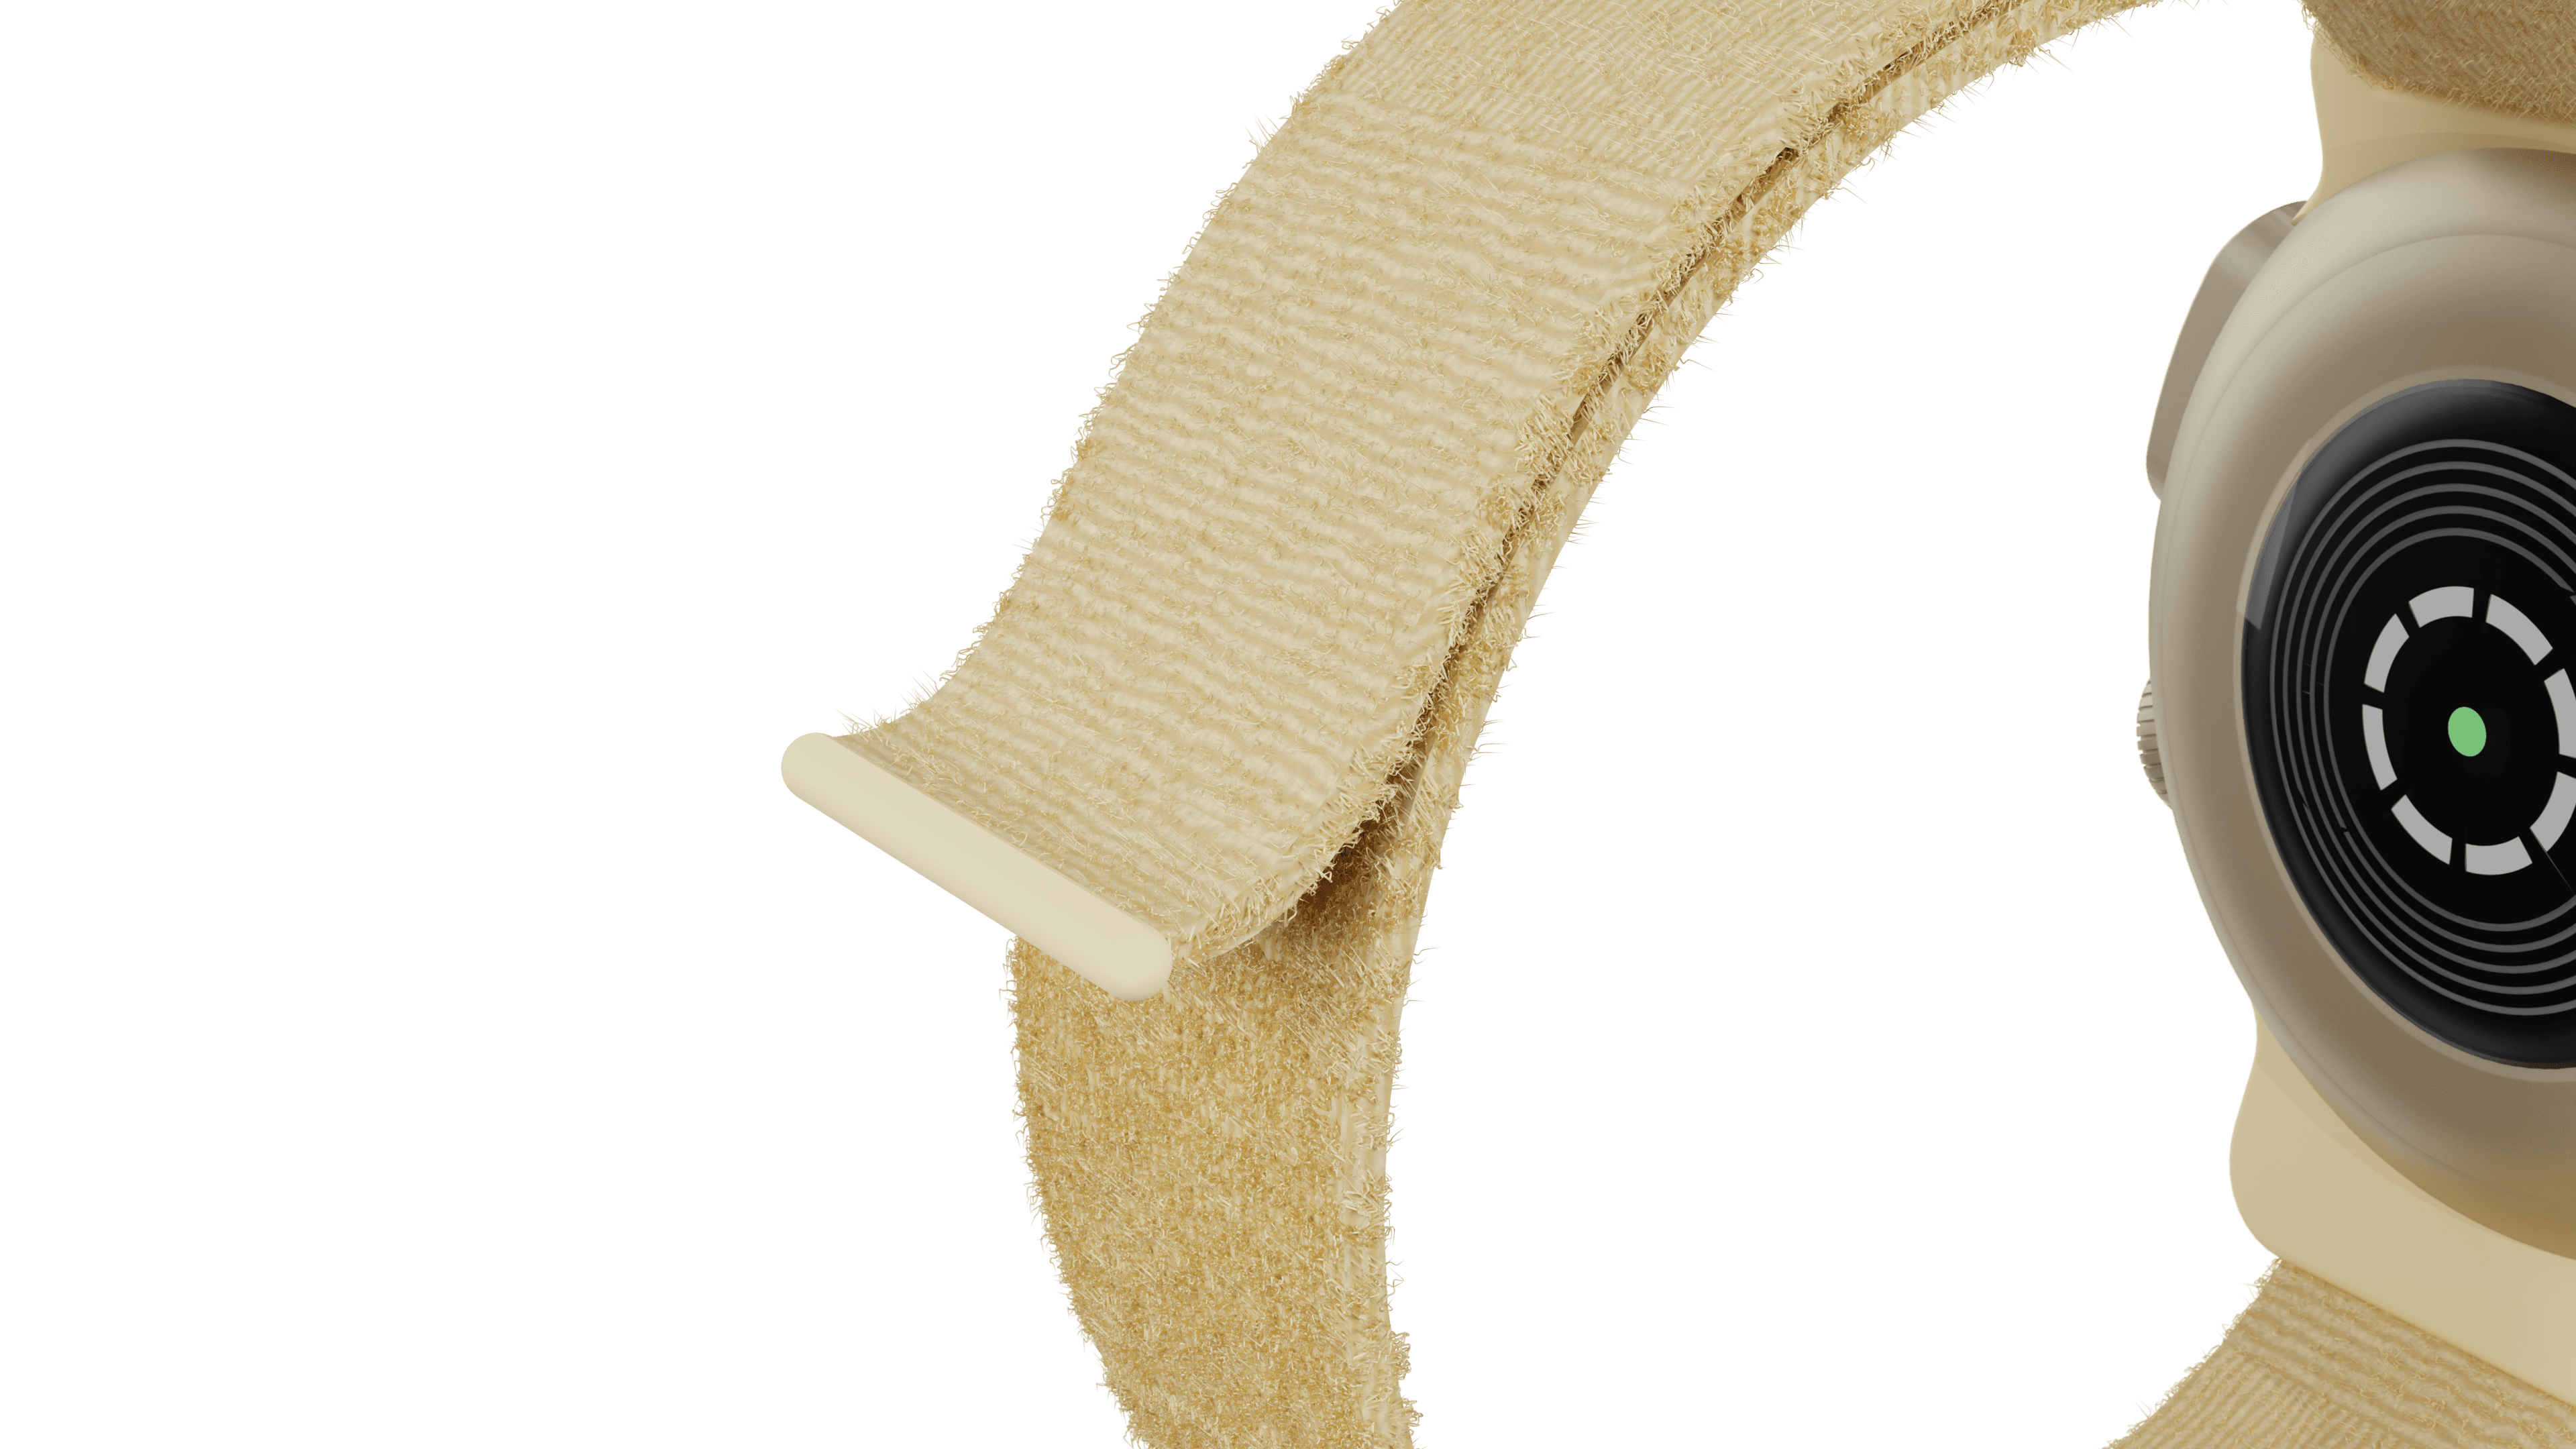
Final Design.
Final Design.
Final Model & Branding
Final Model & Branding
Core Physical Features
Core Physical Features
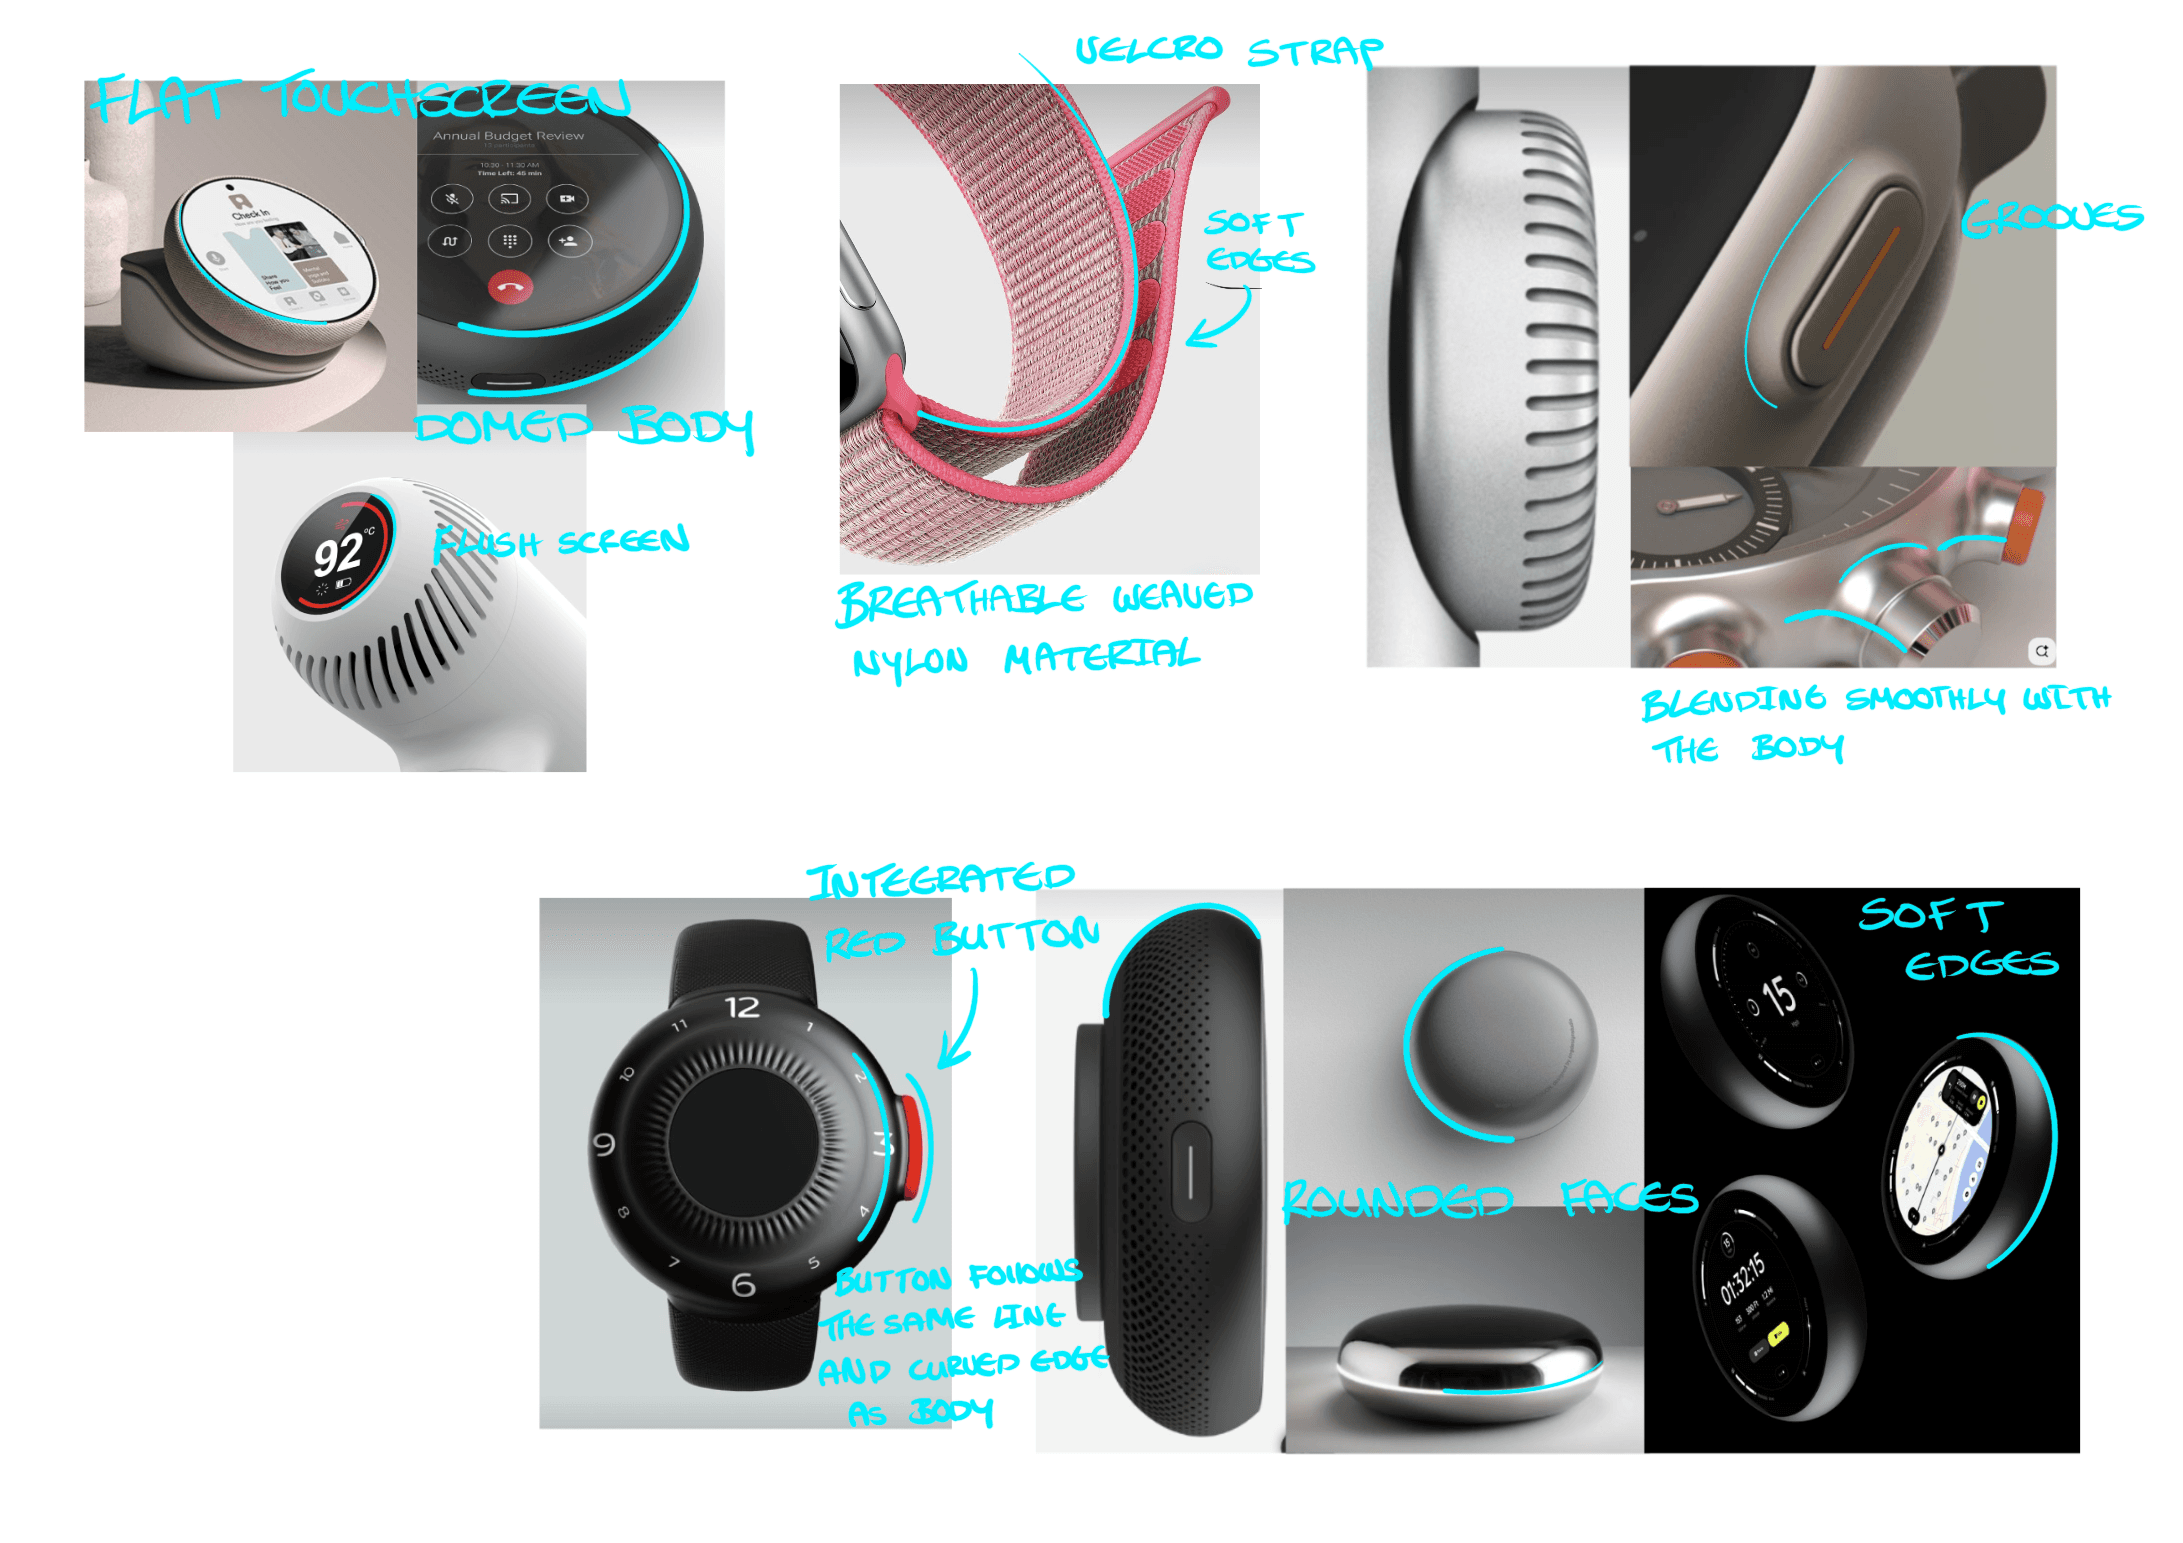
Moodboard
Moodboard
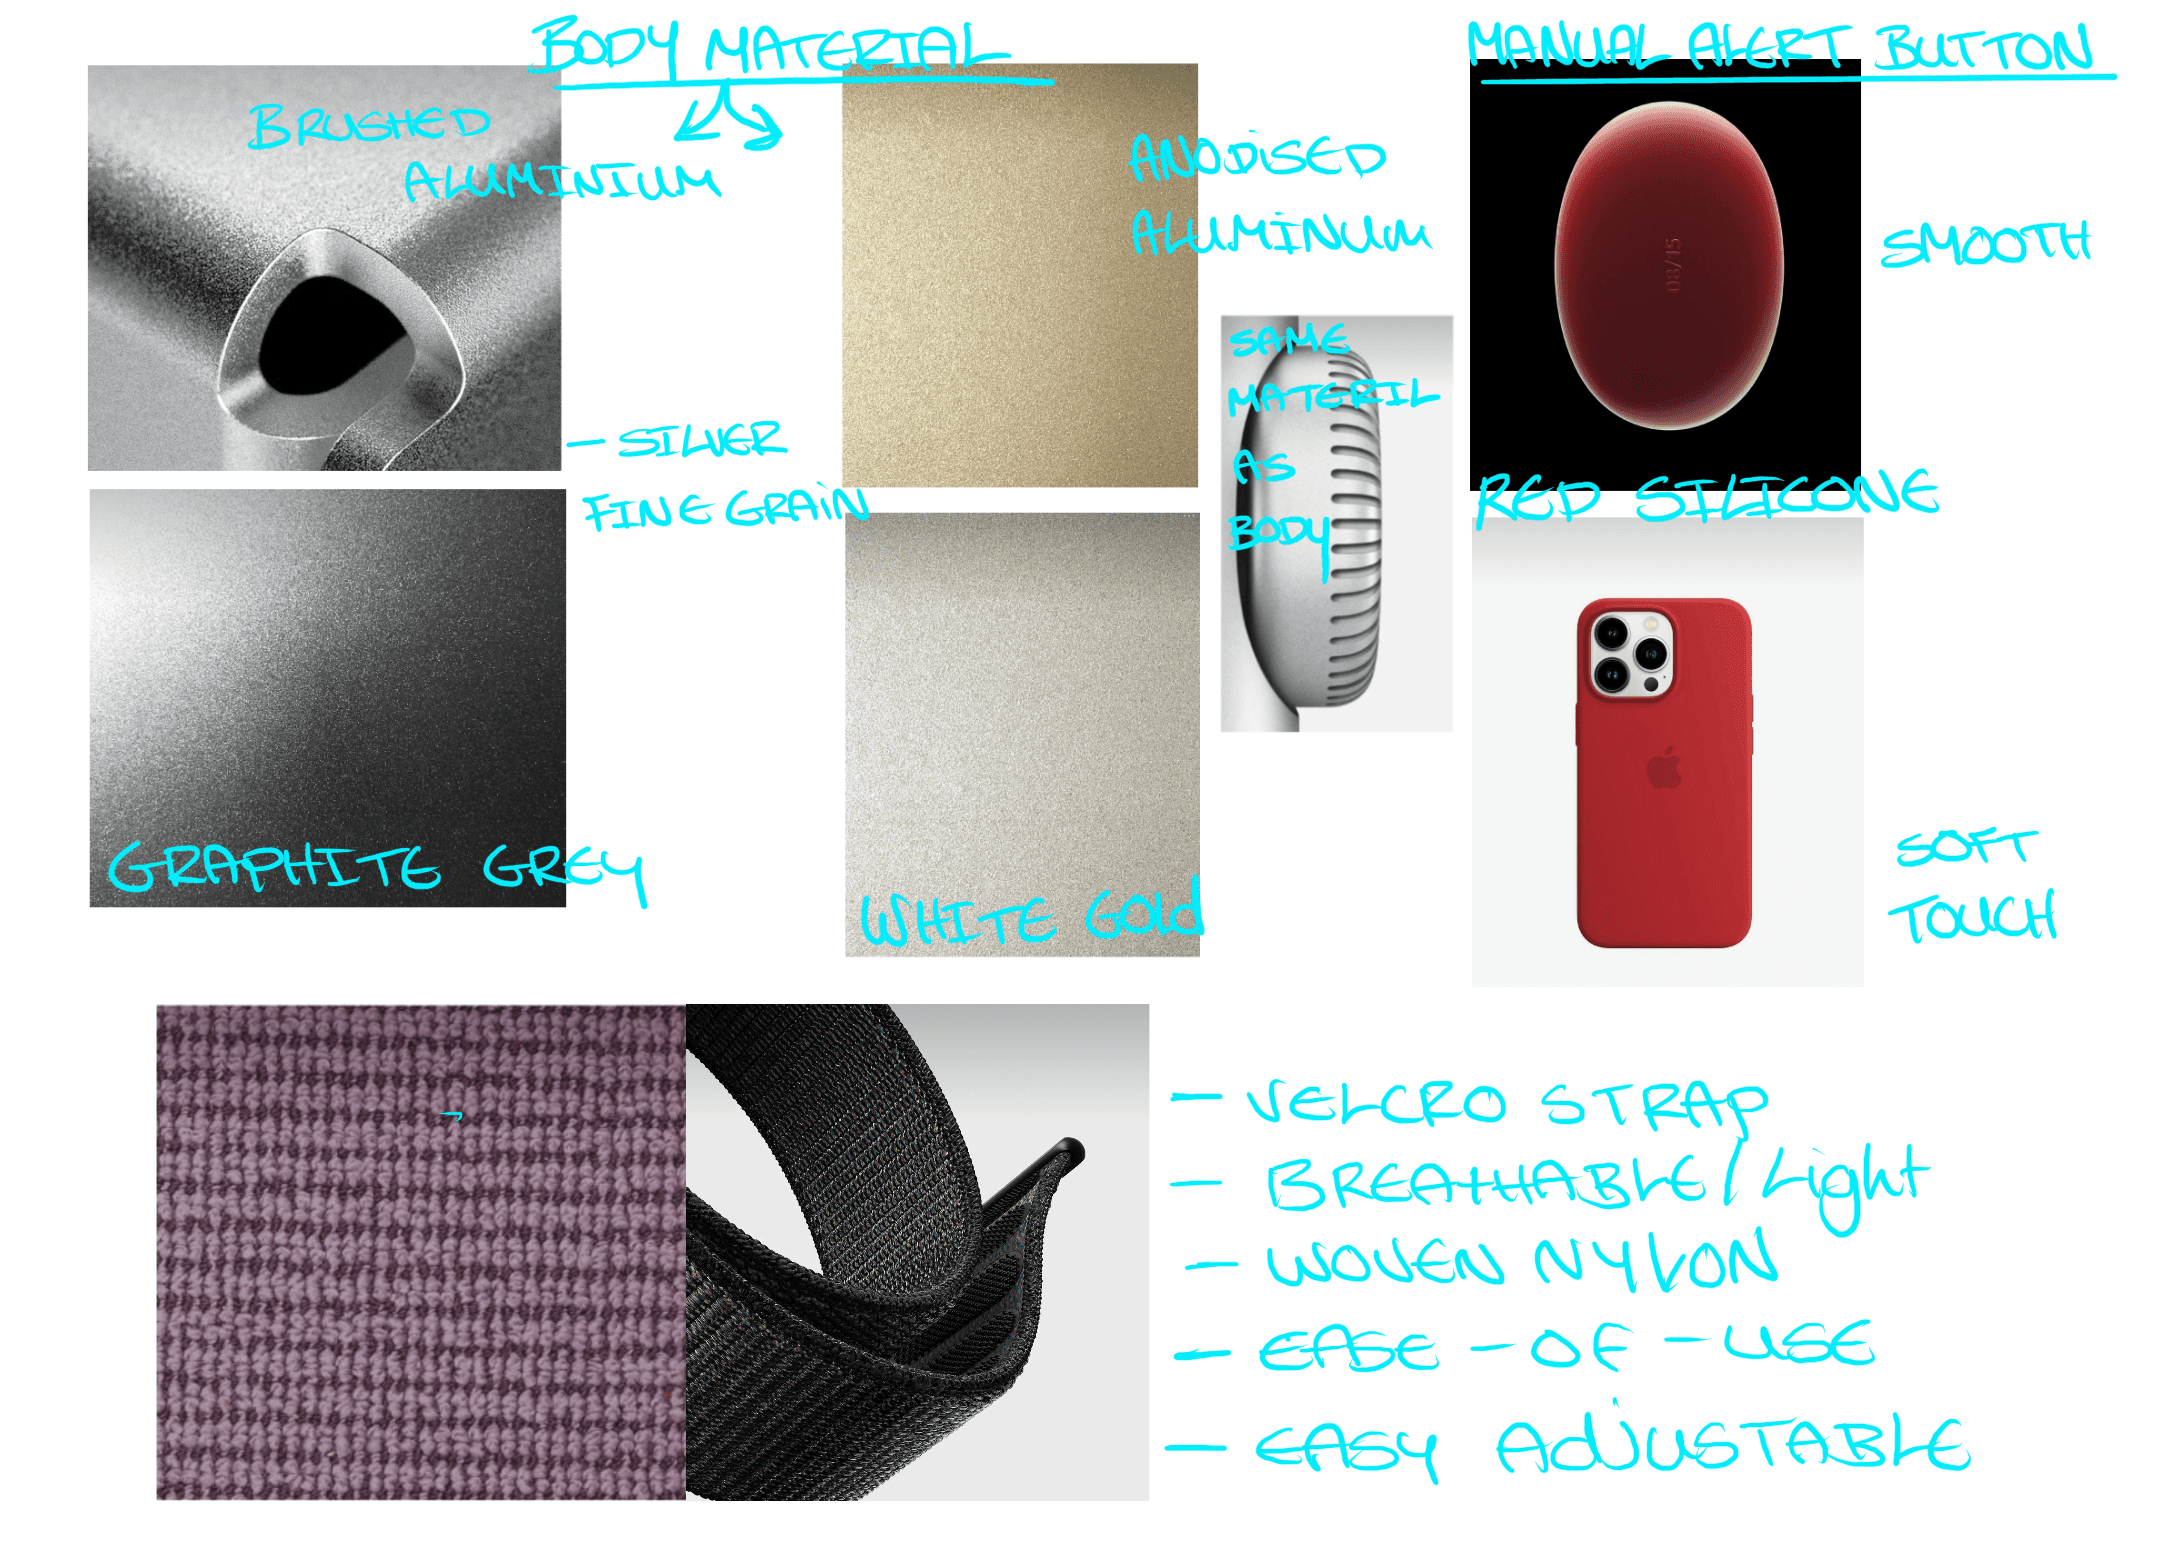
Materials & Colour
Materials & Colour
Moodboard
Moodboard


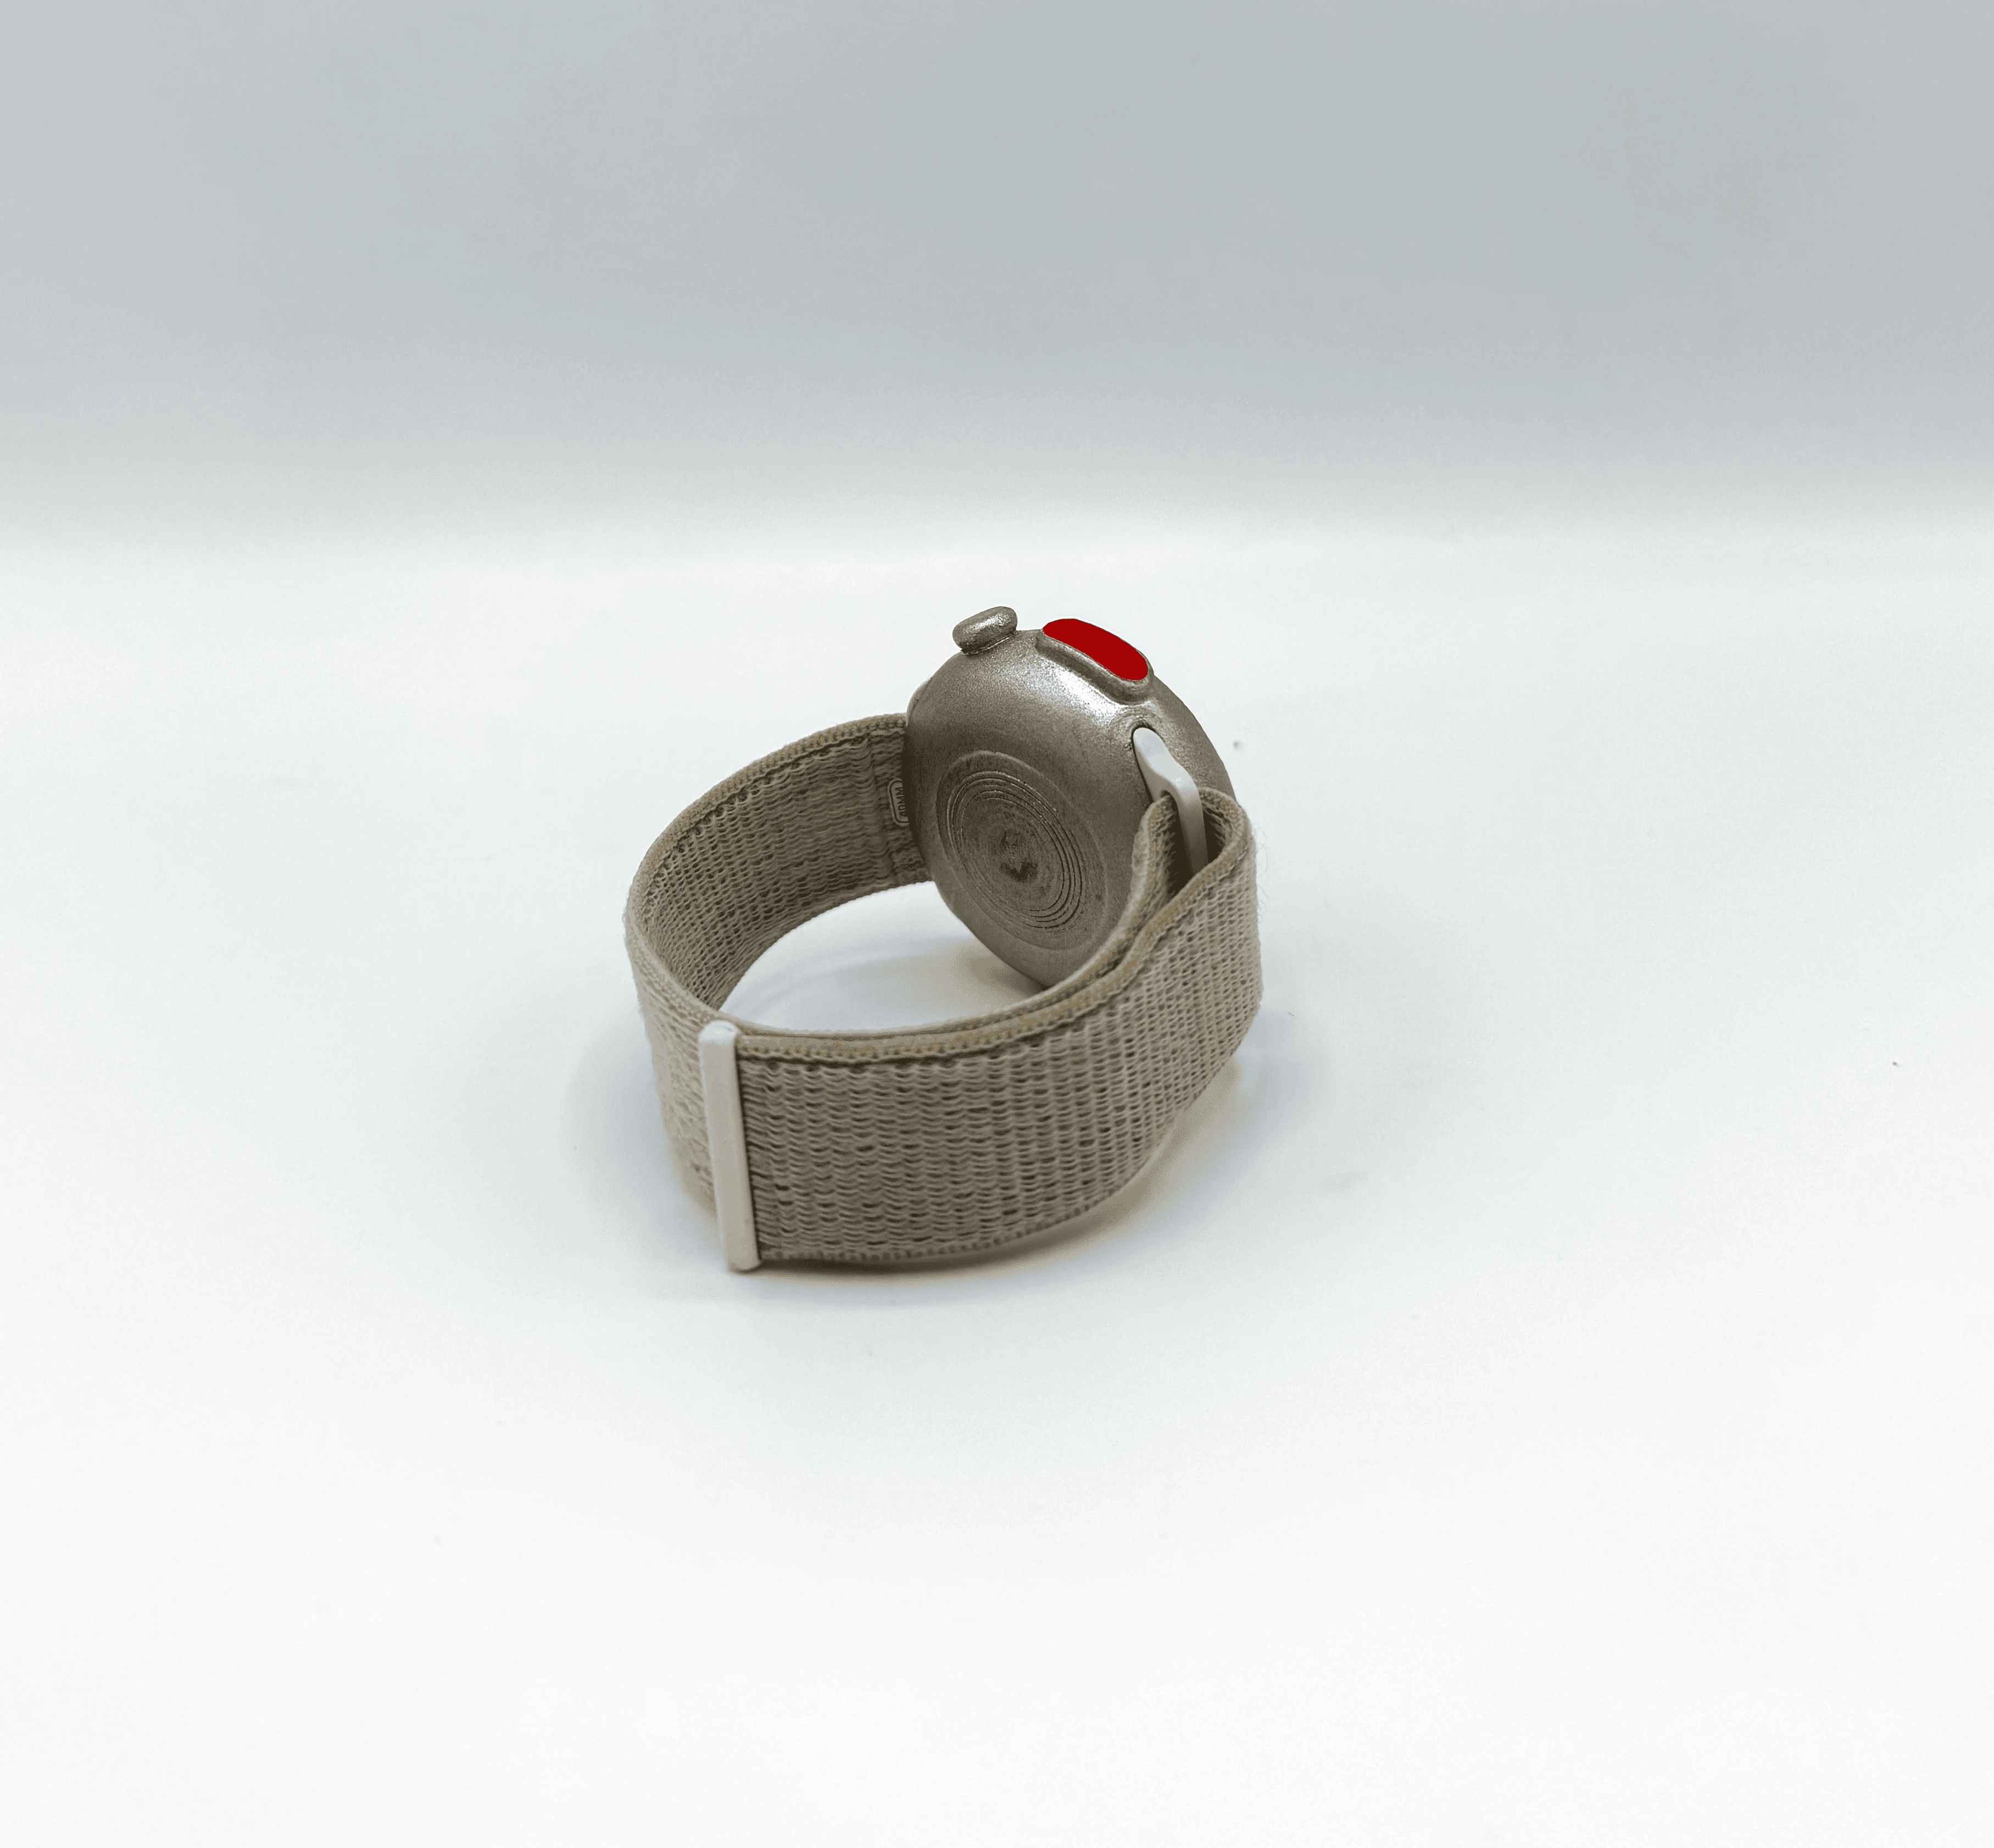
Final 3D Print
Final 3D Print
The final stage consisted of refining the 3D-printed model to achieve a smooth, professional finish. The process consisted of sanding & wet sanding the surface and applying Polyfiller to any imperfections, repeating the process until the texture felt consistent. Carefully preparing the model for priming by masking off areas like the acrylic screen. After filling and smoothing the joint lines with Polyfiller, I gradually increased the sandpaper grit to ensure a flawless, even surface ready for finishing. Finally, I spray-painted the model and added detailed touches to highlight the manual emergency button.
The final stage consisted of refining the 3D-printed model to achieve a smooth, professional finish. The process consisted of sanding & wet sanding the surface and applying Polyfiller to any imperfections, repeating the process until the texture felt consistent. Carefully preparing the model for priming by masking off areas like the acrylic screen. After filling and smoothing the joint lines with Polyfiller, I gradually increased the sandpaper grit to ensure a flawless, even surface ready for finishing. Finally, I spray-painted the model and added detailed touches to highlight the manual emergency button.
The final stage consisted of refining the 3D-printed model to achieve a smooth, professional finish. The process consisted of sanding & wet sanding the surface and applying Polyfiller to any imperfections, repeating the process until the texture felt consistent. Carefully preparing the model for priming by masking off areas like the acrylic screen. After filling and smoothing the joint lines with Polyfiller, I gradually increased the sandpaper grit to ensure a flawless, even surface ready for finishing. Finally, I spray-painted the model and added detailed touches to highlight the manual emergency button.


Wet Sanding
Wet Sanding
Once I collected the 3D print of my final model I began sanding it smooth. I inserted Polyfiller into areas where needed in order to make a smooth surface. I repeated this process until I was satisfied with the external texture and feel of the body.
Once I collected the 3D print of my final model I began sanding it smooth. I inserted Polyfiller into areas where needed in order to make a smooth surface. I repeated this process until I was satisfied with the external texture and feel of the body.
Once I collected the 3D print of my final model I began sanding it smooth. I inserted Polyfiller into areas where needed in order to make a smooth surface. I repeated this process until I was satisfied with the external texture and feel of the body.


Primer
Primer
Once I collected the 3D print of my final model I began sanding it smooth. I inserted Polyfiller into areas where needed in order to make a smooth surface. I repeated this process until I was satisfied with the external texture and feel of the body.
Once I collected the 3D print of my final model I began sanding it smooth. I inserted Polyfiller into areas where needed in order to make a smooth surface. I repeated this process until I was satisfied with the external texture and feel of the body.
Once I collected the 3D print of my final model I began sanding it smooth. I inserted Polyfiller into areas where needed in order to make a smooth surface. I repeated this process until I was satisfied with the external texture and feel of the body.
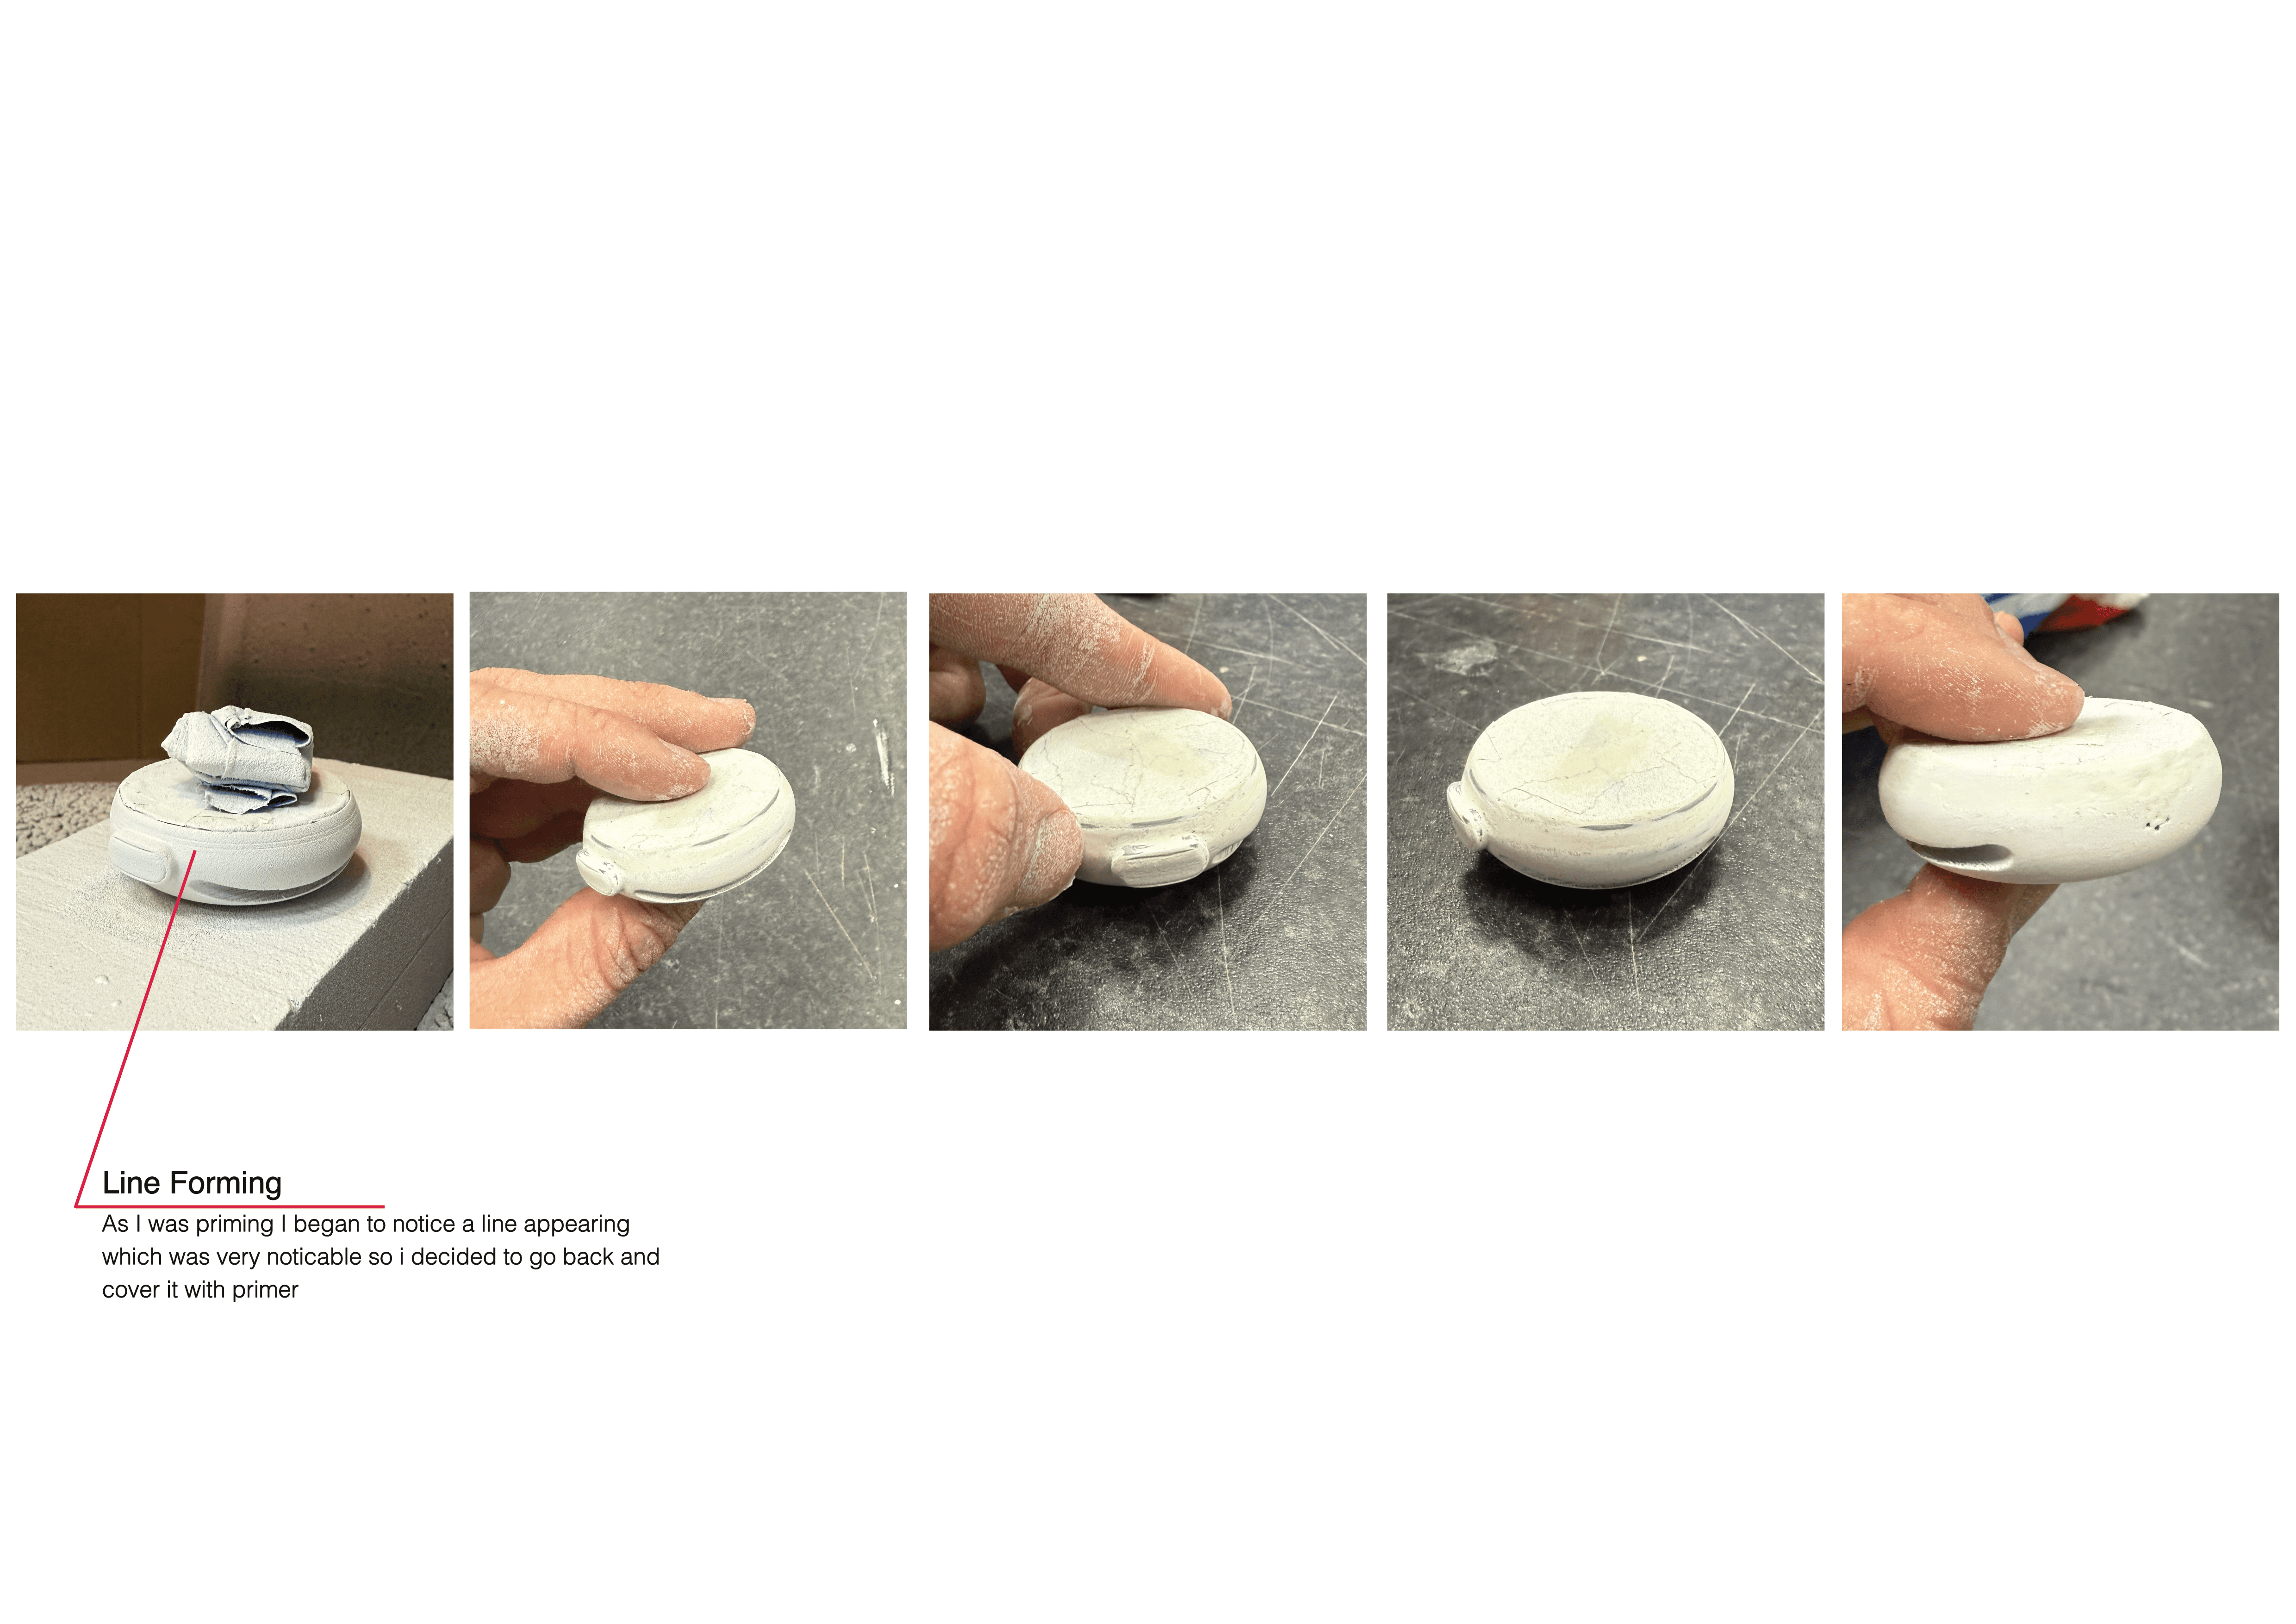
Poly Filler & Sanding
Poly Filler & Sanding
I filled the line with Poly Filler and went back sanding it down until it was flush with the rest of the body and worked my way up with the sand paper numbers in order to get it smooth once more.
I filled the line with Poly Filler and went back sanding it down until it was flush with the rest of the body and worked my way up with the sand paper numbers in order to get it smooth once more.
I filled the line with Poly Filler and went back sanding it down until it was flush with the rest of the body and worked my way up with the sand paper numbers in order to get it smooth once more.


Primer & Spray painting
Primer & Spray painting


Logo & Branding
Logo & Branding
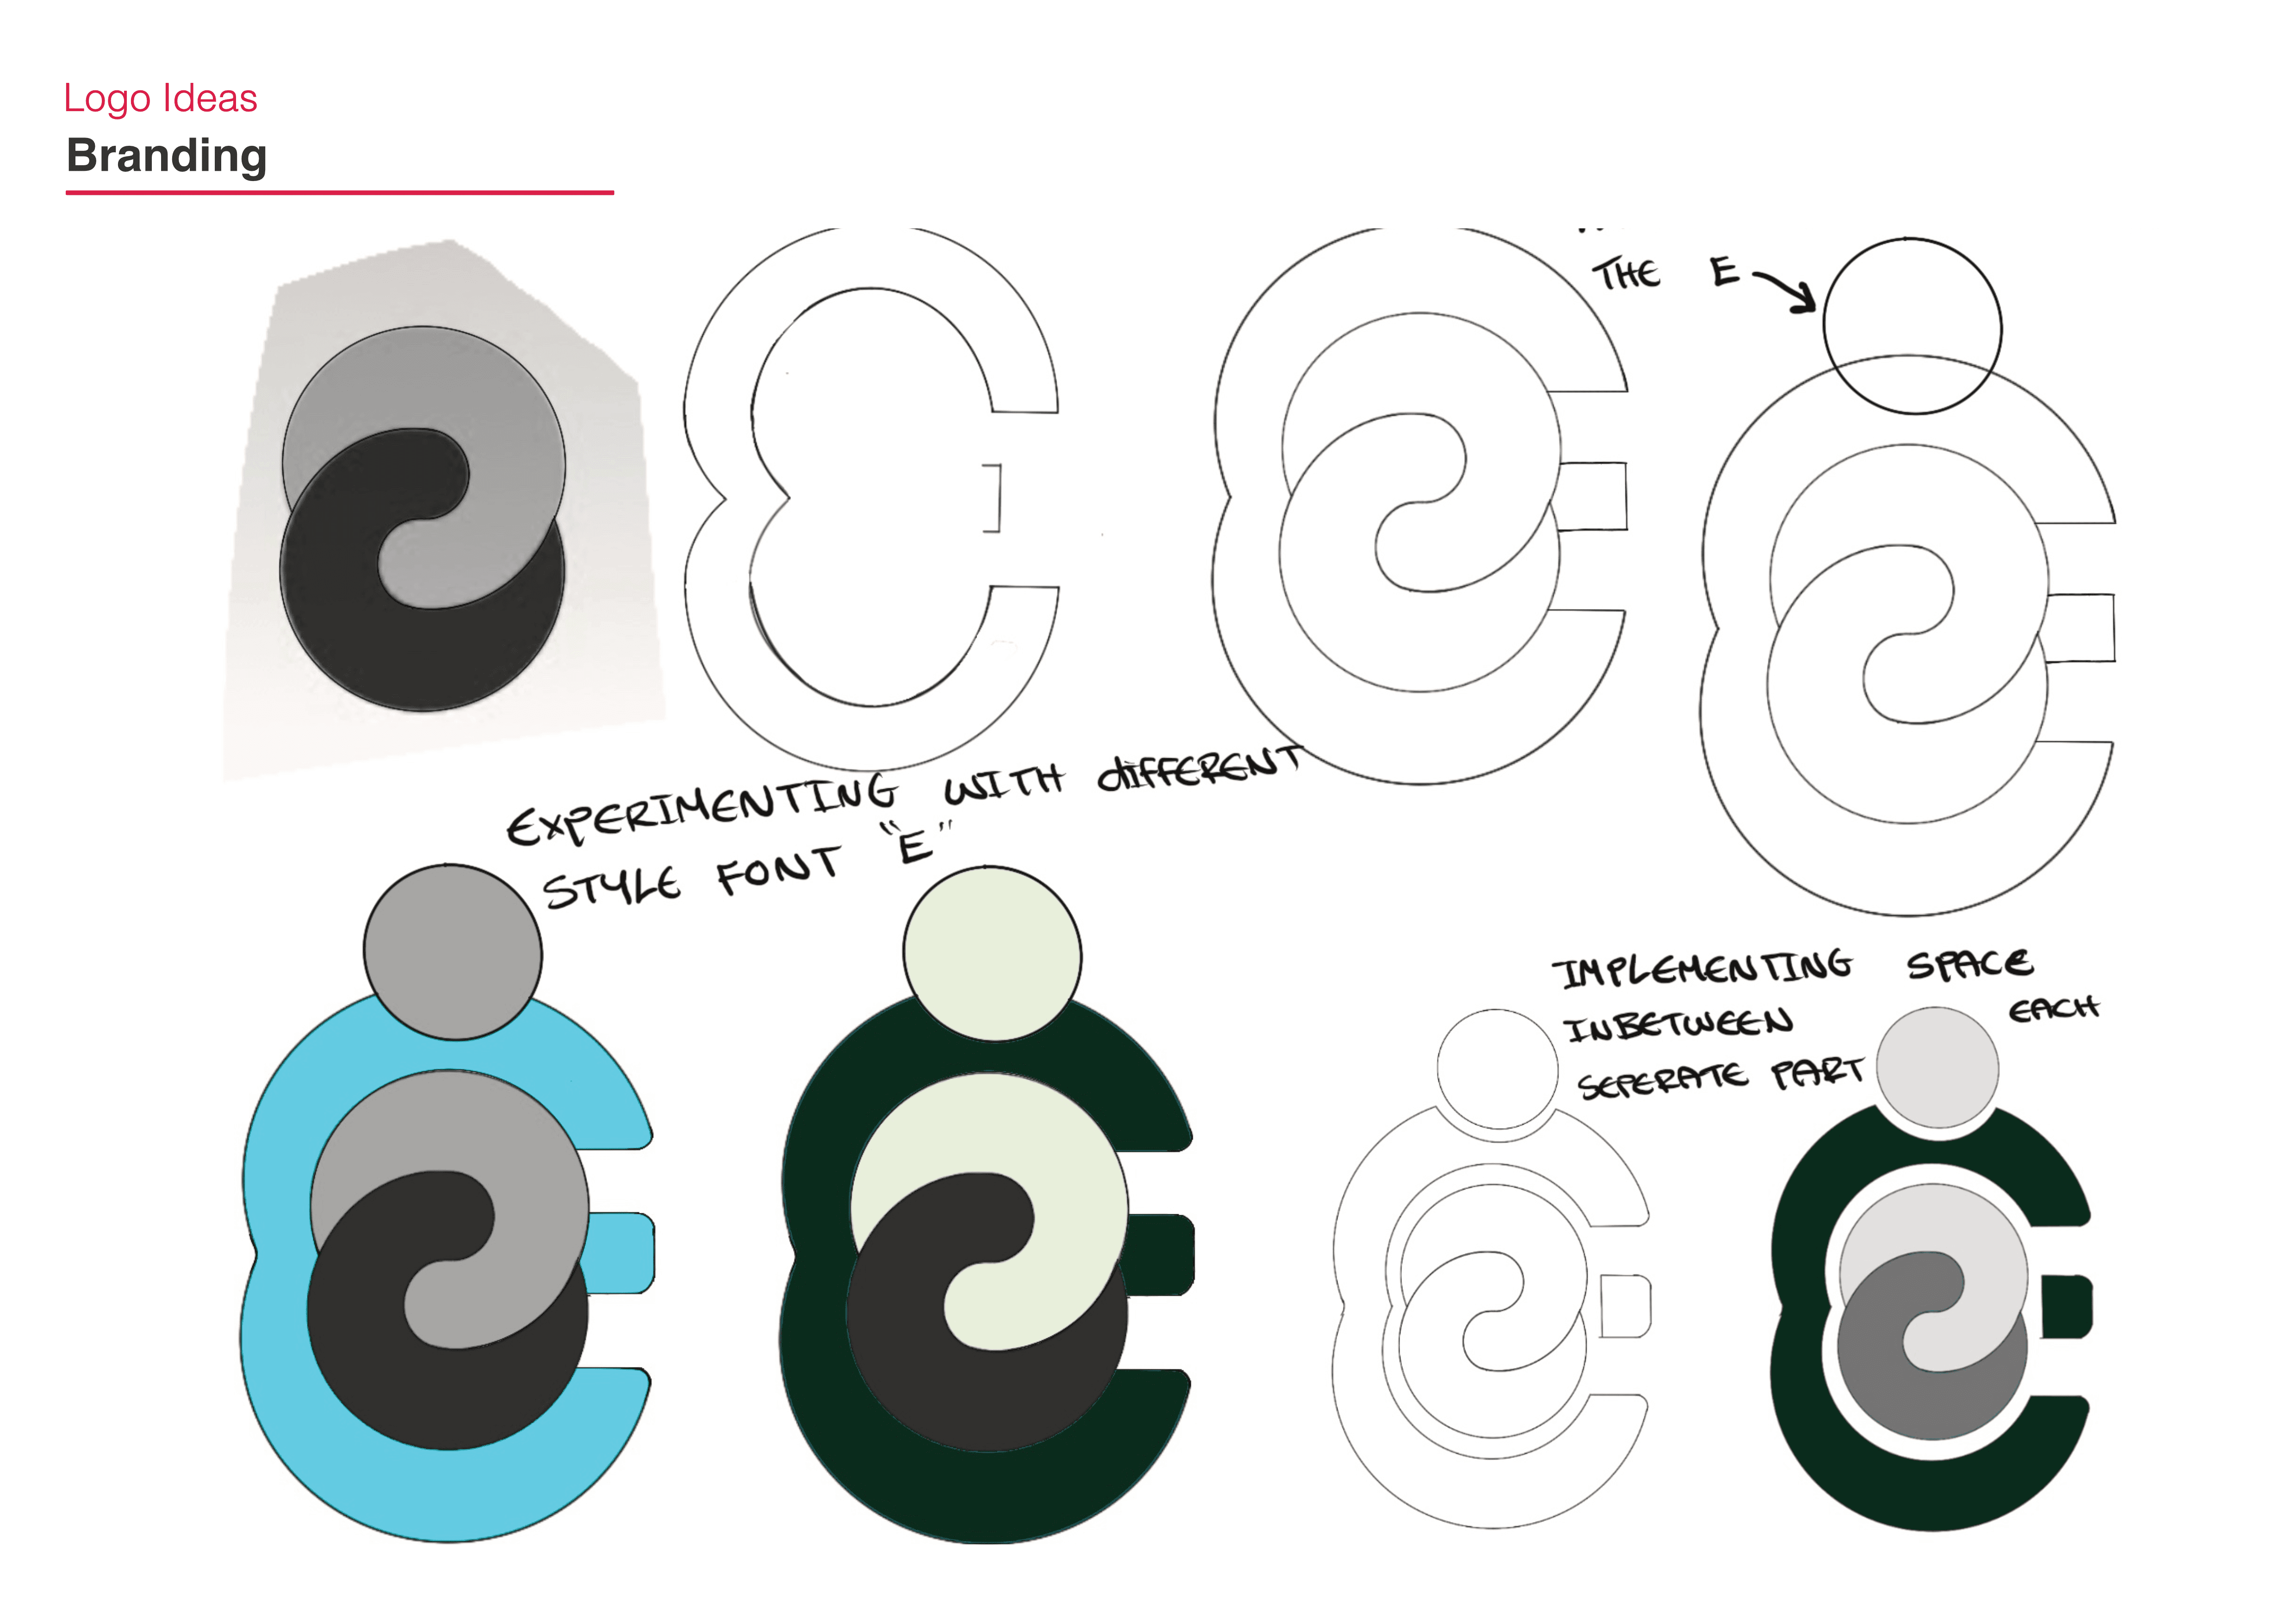
Branding
Branding
Logo Iterations
Logo Iterations
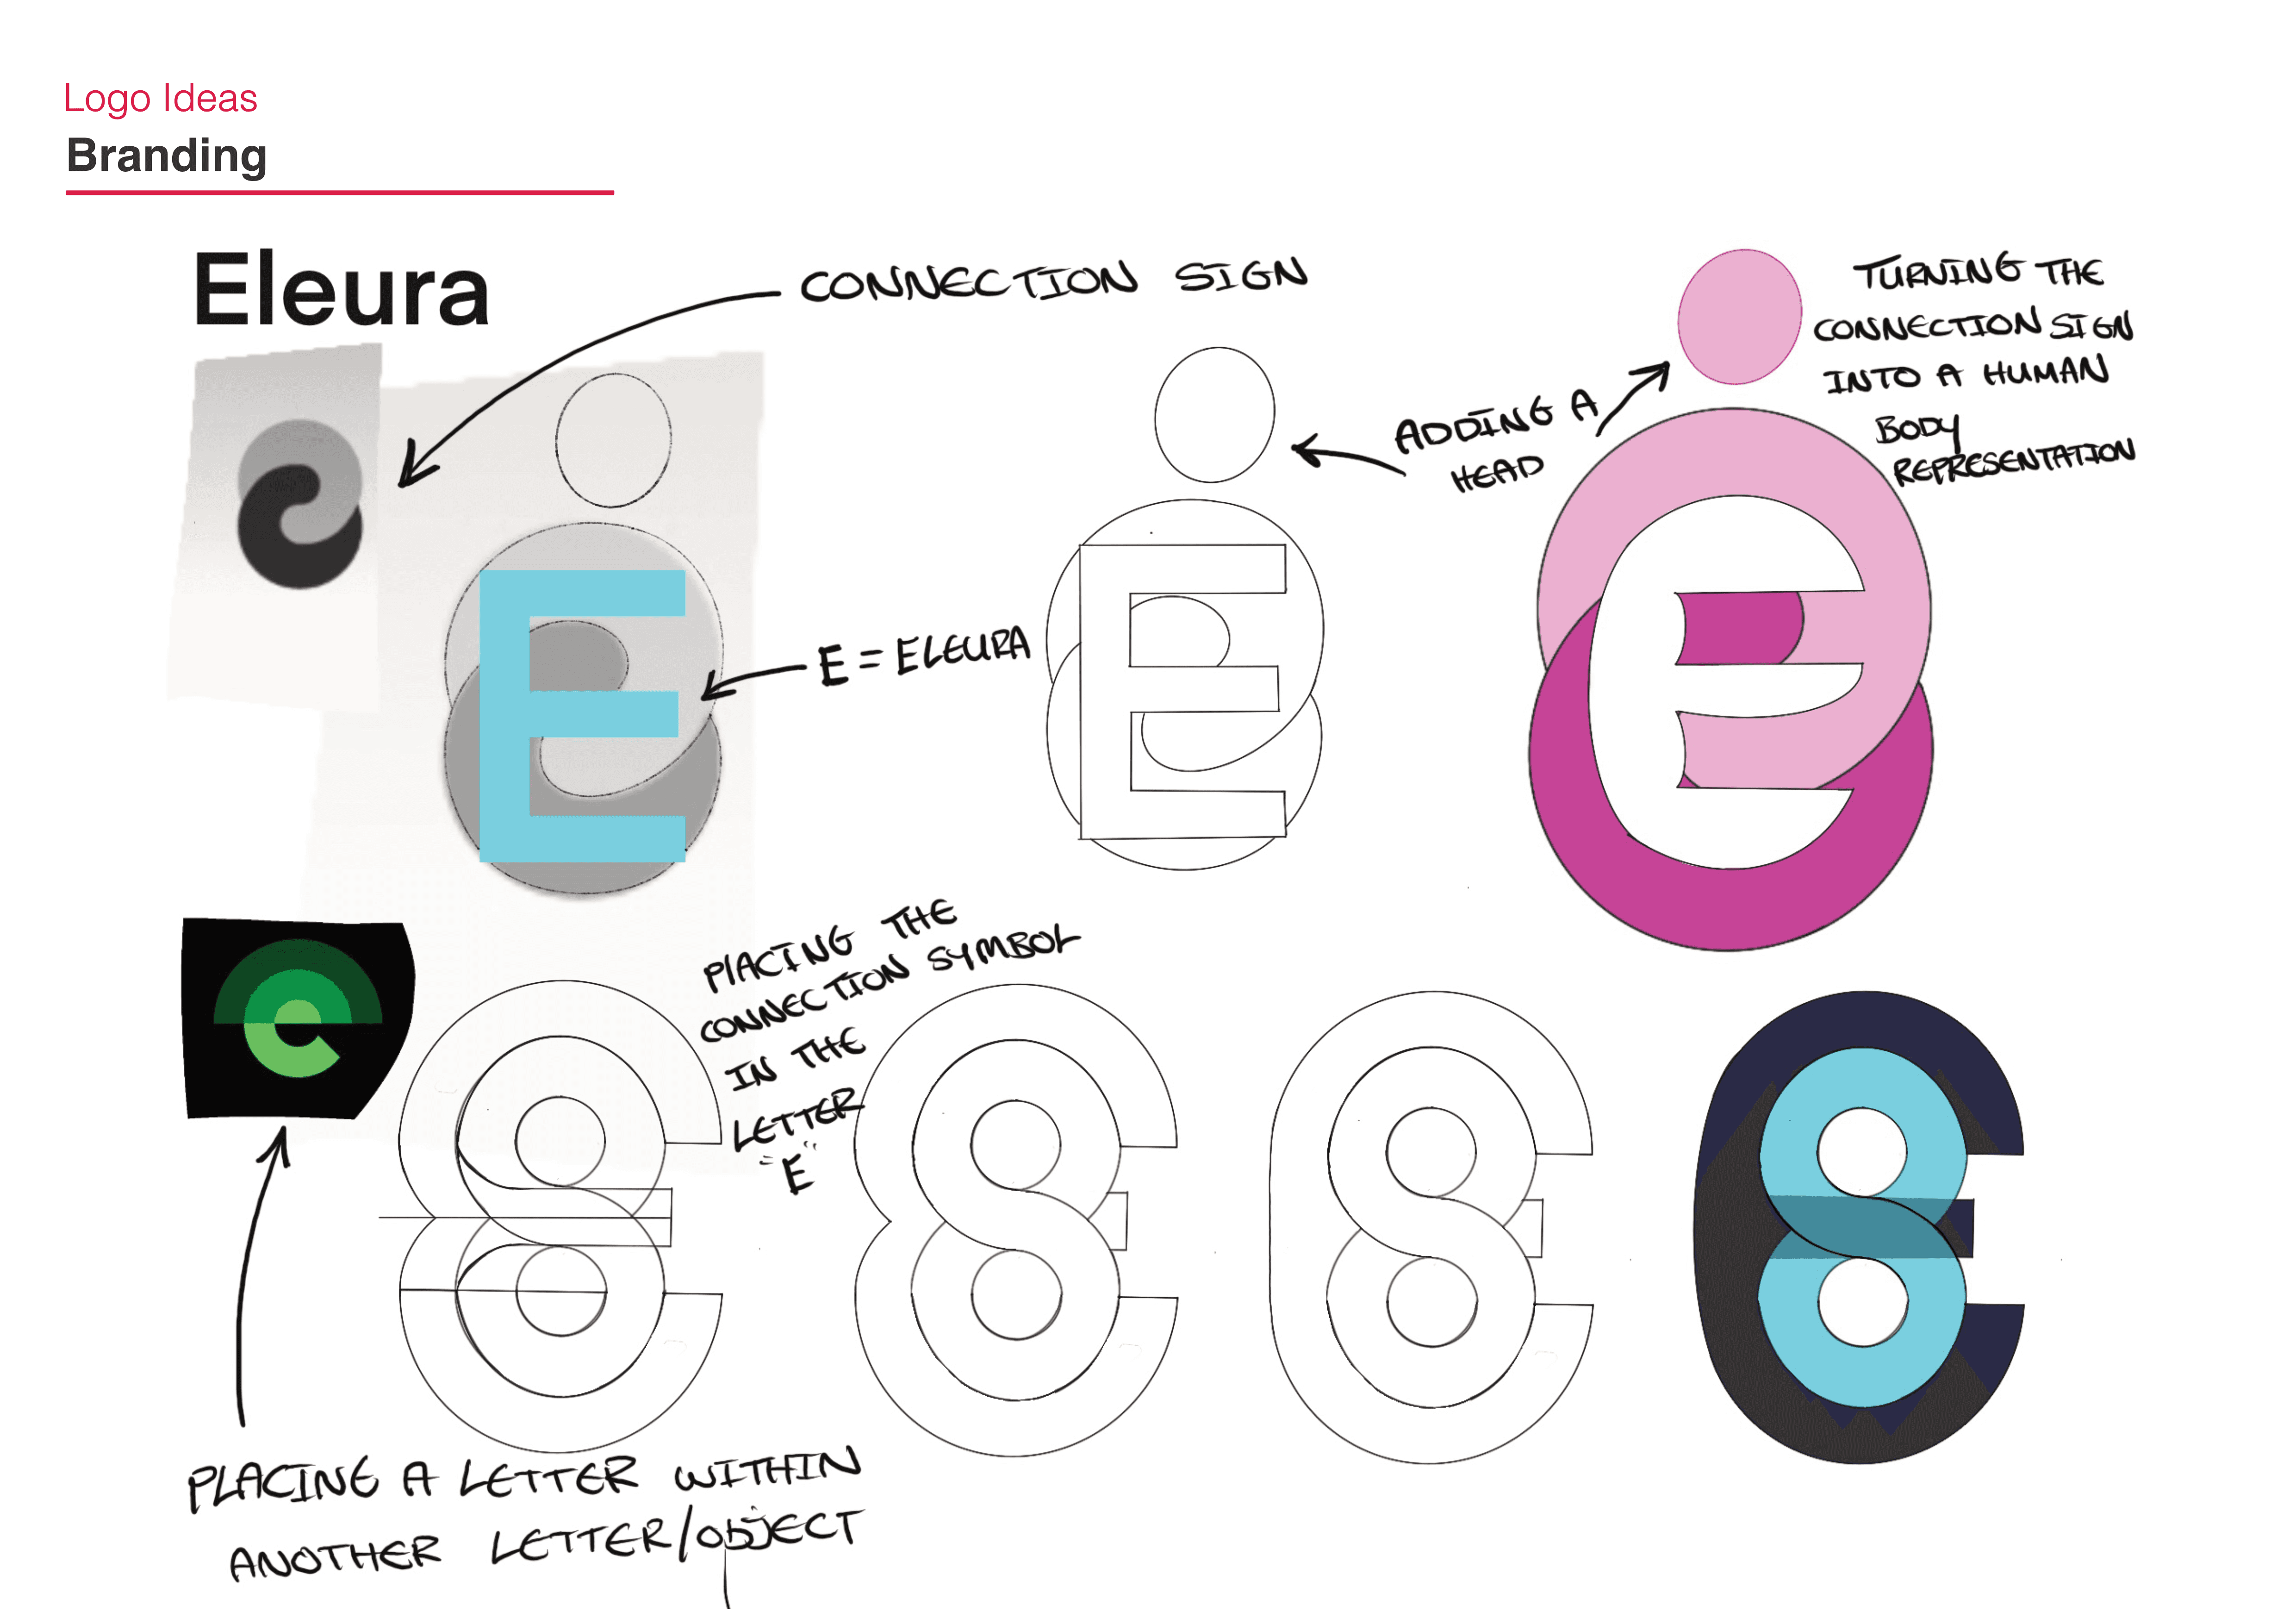
Branding
Branding
Logo Iterations
Logo Iterations

